Monday, September 30, 2013

Swagger: make developers love working with your REST API

As JAX-RS API is evolving, with version 2.0 released earlier this year under JSR-339 umbrella, it's becoming even more easy to create REST services using excellent Java platform.

But with great simplicity comes great responsibility: documenting all these APIs so other developers could quickly understand how to use them. Unfortunately, in this area developers are on their own: the JSR-339 doesn't help much. For sure, it would be just awesome to generate verbose and easy to follow documentation from source code, and not asking someone to write it along the development process. Sounds unreal, right? In certain extent, it really is, but help is coming in a form of Swagger.

Essentially, Swagger does a simple but very powerful thing: with a bit of additional annotations it generates the REST API descriptions (HTTP methods, path / query / form parameters, responses, HTTP error codes, ...) and even provides a simple web UI to play with REST calls to your APIs (not to mention that all this metadata is available over REST as well).

Before digging into implementation details, let's take a quick look what Swagger is from API consumer prospective. Assume you have developed a great REST service to manage people. As a good citizen, this REST service is feature-complete and provides following functionality:

  • lists all people (GET)
  • looks up person by e-mail (GET)
  • adds new person (POST)
  • updates existing person (PUT)
  • and finally removes person (DELETE)
Here is the same API from Swagger's perspective:

It looks quite pretty. Let's do more and call our REST service from Swagger UI, here this awesome framework really shines. The most complicated use-case is adding new person (POST) so this one will be looked closely.

As you can see on the snapshot above, every piece of REST service call is there:

  • description of the service
  • relative context path
  • parameters (form / path / query), required or optional
  • HTTP status codes: 201 CREATED and 409 CONFLICT
  • ready to go Try it out! to call REST service immediately (with out-of-the box parameters validation)

To complete the demo part, let me show yet another example, where REST resource is being involved (in our case, it's a simple class Person). Swagger is able to provide its properties and meaningful description together with expected response content type(s).

Looks nice! Moving on to the next part, it's all about implementation details. Swagger supports seamless integration with JAX-RS services, with just couple of additional annotations required on top of existing ones. Firstly, every single JAX-RS service which supposed to be documented should be annotated with @Api annotation, in our case:

@Path( "/people" ) 
@Api( value = "/people", description = "Manage people" )
public class PeopleRestService {
    // ...
}

Next, the same approach is applicable to REST service operations: every method which supposed to be documented should be annotated with @ApiOperation annotation, and optionally with @ApiResponses/@ApiResponse. If it accepts parameters, those should be annotated with @ApiParam annotation. Couple of examples here:

@Produces( { MediaType.APPLICATION_JSON } )
@GET
@ApiOperation( 
    value = "List all people", 
    notes = "List all people using paging", 
    response = Person.class, 
    responseContainer = "List"
)
public Collection< Person > getPeople(  
        @ApiParam( value = "Page to fetch", required = true ) 
        @QueryParam( "page") @DefaultValue( "1" ) final int page ) {
    // ...
}

And another one:

@Produces( { MediaType.APPLICATION_JSON } )
@Path( "/{email}" )
@GET
@ApiOperation( 
    value = "Find person by e-mail", 
    notes = "Find person by e-mail", 
    response = Person.class 
)
@ApiResponses( {
    @ApiResponse( code = 404, message = "Person with such e-mail doesn't exists" )    
} )
public Person getPeople( 
        @ApiParam( value = "E-Mail address to lookup for", required = true ) 
        @PathParam( "email" ) final String email ) {
    // ...
}

REST resource classes (or model classes) require special annotations: @ApiModel and @ApiModelProperty. Here is how our Person class looks like:

@ApiModel( value = "Person", description = "Person resource representation" )
public class Person {
    @ApiModelProperty( value = "Person's first name", required = true ) 
    private String email;
    @ApiModelProperty( value = "Person's e-mail address", required = true ) 
    private String firstName;
    @ApiModelProperty( value = "Person's last name", required = true ) 
    private String lastName;

    // ...
}

The last steps is to plug in Swagger into JAX-RS application. The example I have developed uses Spring Framework, Apache CXF, Swagger UI and embedded Jetty (complete project is available on Github). Integrating Swagger is a matter of adding configuration bean (swaggerConfig), one additional JAX-RS service (apiListingResourceJson) and two JAX-RS providers (resourceListingProvider and apiDeclarationProvider).

package com.example.config;

import java.util.Arrays;

import javax.ws.rs.ext.RuntimeDelegate;

import org.apache.cxf.bus.spring.SpringBus;
import org.apache.cxf.endpoint.Server;
import org.apache.cxf.jaxrs.JAXRSServerFactoryBean;
import org.springframework.beans.factory.annotation.Autowired;
import org.springframework.context.annotation.Bean;
import org.springframework.context.annotation.Configuration;
import org.springframework.context.annotation.DependsOn;
import org.springframework.core.env.Environment;

import com.example.resource.Person;
import com.example.rs.JaxRsApiApplication;
import com.example.rs.PeopleRestService;
import com.example.services.PeopleService;
import com.fasterxml.jackson.jaxrs.json.JacksonJsonProvider;
import com.wordnik.swagger.jaxrs.config.BeanConfig;
import com.wordnik.swagger.jaxrs.listing.ApiDeclarationProvider;
import com.wordnik.swagger.jaxrs.listing.ApiListingResourceJSON;
import com.wordnik.swagger.jaxrs.listing.ResourceListingProvider;

@Configuration
public class AppConfig {
    public static final String SERVER_PORT = "server.port";
    public static final String SERVER_HOST = "server.host";
    public static final String CONTEXT_PATH = "context.path";  
 
    @Bean( destroyMethod = "shutdown" )
    public SpringBus cxf() {
        return new SpringBus();
    }
 
    @Bean @DependsOn( "cxf" )
    public Server jaxRsServer() {
        JAXRSServerFactoryBean factory = RuntimeDelegate.getInstance().createEndpoint( jaxRsApiApplication(), JAXRSServerFactoryBean.class );
        factory.setServiceBeans( Arrays.< Object >asList( peopleRestService(), apiListingResourceJson() ) );
        factory.setAddress( factory.getAddress() );
        factory.setProviders( Arrays.< Object >asList( jsonProvider(), resourceListingProvider(), apiDeclarationProvider() ) );
        return factory.create();
    }
 
    @Bean @Autowired
    public BeanConfig swaggerConfig( Environment environment ) {
        final BeanConfig config = new BeanConfig();

        config.setVersion( "1.0.0" );
        config.setScan( true );
        config.setResourcePackage( Person.class.getPackage().getName() );
        config.setBasePath( 
            String.format( "http://%s:%s/%s%s",
                environment.getProperty( SERVER_HOST ),
                environment.getProperty( SERVER_PORT ),
                environment.getProperty( CONTEXT_PATH ),
                jaxRsServer().getEndpoint().getEndpointInfo().getAddress() 
            ) 
        );
  
        return config;
    }

    @Bean
    public ApiDeclarationProvider apiDeclarationProvider() {
        return new ApiDeclarationProvider();
    }
 
    @Bean
    public ApiListingResourceJSON apiListingResourceJson() {
        return new ApiListingResourceJSON();
    }
 
    @Bean
    public ResourceListingProvider resourceListingProvider() {
        return new ResourceListingProvider();
    }
 
    @Bean 
    public JaxRsApiApplication jaxRsApiApplication() {
        return new JaxRsApiApplication();
    }
 
    @Bean 
    public PeopleRestService peopleRestService() {
        return new PeopleRestService();
    }
   
    // ... 
}

In order to get rid of any possible hard-coded configuration, all parameters are passed through named properties (SERVER_PORT, SERVER_HOST and CONTEXT_PATH). Swagger exposes additional REST endpoint to provide API documentation, in our case it is accessible at: http://localhost:8080/rest/api/api-docs. It is used by Swagger UI which itself is embedded into final JAR archive and served by Jetty as static web resource.

The final piece of the puzzle is to start embedded Jetty container which glues all those parts together and is encapsulated into Starter class:

package com.example;

import org.apache.cxf.transport.servlet.CXFServlet;
import org.eclipse.jetty.server.Server;
import org.eclipse.jetty.server.handler.HandlerList;
import org.eclipse.jetty.servlet.DefaultServlet;
import org.eclipse.jetty.servlet.ServletContextHandler;
import org.eclipse.jetty.servlet.ServletHolder;
import org.eclipse.jetty.util.resource.Resource;
import org.springframework.core.io.ClassPathResource;
import org.springframework.web.context.ContextLoaderListener;
import org.springframework.web.context.support.AnnotationConfigWebApplicationContext;

import com.example.config.AppConfig;

public class Starter {
    private static final int SERVER_PORT = 8080;
    private static final String CONTEXT_PATH = "rest";
 
    public static void main( final String[] args ) throws Exception {
        Resource.setDefaultUseCaches( false );
  
        final Server server = new Server( SERVER_PORT );  
        System.setProperty( AppConfig.SERVER_PORT, Integer.toString( SERVER_PORT ) );
        System.setProperty( AppConfig.SERVER_HOST, "localhost" );
        System.setProperty( AppConfig.CONTEXT_PATH, CONTEXT_PATH );    

        // Configuring Apache CXF servlet and Spring listener  
        final ServletHolder servletHolder = new ServletHolder( new CXFServlet() );      
        final ServletContextHandler context = new ServletContextHandler();   
        context.setContextPath( "/" );
        context.addServlet( servletHolder, "/" + CONTEXT_PATH + "/*" );     
        context.addEventListener( new ContextLoaderListener() ); 
     
        context.setInitParameter( "contextClass", AnnotationConfigWebApplicationContext.class.getName() );
        context.setInitParameter( "contextConfigLocation", AppConfig.class.getName() );
   
        // Configuring Swagger as static web resource
        final ServletHolder swaggerHolder = new ServletHolder( new DefaultServlet() );
        final ServletContextHandler swagger = new ServletContextHandler();
        swagger.setContextPath( "/swagger" );
        swagger.addServlet( swaggerHolder, "/*" );
        swagger.setResourceBase( new ClassPathResource( "/webapp" ).getURI().toString() );

        final HandlerList handlers = new HandlerList();
        handlers.addHandler( context );
        handlers.addHandler( swagger );
   
        server.setHandler( handlers );
        server.start();
        server.join(); 
    }
}

Couple of comments make thing a bit more clear: our JAX-RS services will be available under /rest/* context path while Swagger UI is available under /swagger context path. The one important note concerning Resource.setDefaultUseCaches( false ): because we are serving static web content from JAR file, we have to set this property to false as workaround for this bug.

Now, let's build and run our JAX-RS application by typing:

mvn clean package
java -jar target/jax-rs-2.0-swagger-0.0.1-SNAPSHOT.jar

In a second, Swagger UI should be available in your browser at: http://localhost:8080/swagger/

As a final note, there are a lot more to say about Swagger but I hope this simple example shows the way to make our REST services self-documented and easily consumable with minimal efforts. Many thanks to Wordnik team for that.

Source code is available on Github.

Saturday, August 31, 2013

Lightweight real-time charts with Play Framework and Scala using server-side events

Continuing a great journey with awesome Play Framework and Scala language, I would like to share yet another interesting implementation of real-time charting: this time by using lightweight server-side events instead of full-duplex WebSockets technology described previously in this post. Indeed, if you don't need a bidirectional communication but only server push, server-side events look as a very natural fit. And if you are using Play Framework, it's really easy to do as well.

Let's try to cover the same use case so it will be fair to compare both implementations: we have couple of hosts and we would like to watch CPU usage on each one in real-time (on a chart). Let's start by creating a simple Play Framework application (choosing Scala as a primary language):

play new play-sse-example

Now, when the layout of our application is ready, our next step is to create some starting web page (using Play Framework's type safe template engine) and name it as views/dashboard.scala.html. Here is how it looks like:

@(title: String, hosts: List[Host])

<!DOCTYPE html>
<html>
  <head>
    <title>@title</title>
    <link rel="stylesheet" media="screen" href="@routes.Assets.at("stylesheets/main.css")">
    <link rel="shortcut icon" type="image/png" href="@routes.Assets.at("images/favicon.png")">
    <script src="@routes.Assets.at("javascripts/jquery-1.9.0.min.js")" type="text/javascript"></script>
    <script src="@routes.Assets.at("javascripts/highcharts.js")" type="text/javascript"></script>
  </head>
    
  <body>
    <div id="hosts">
      <ul class="hosts">
        @hosts.map { host =>
          <li>               
            <a href="#" onclick="javascript:show( '@host.id' )">@host.name</a>
          </li>
        }
      </ul>
    </div>    
    <div id="content">
    </div>
  </body>
</html>

<script type="text/javascript">
function show( hostid ) {
  $('#content').trigger('unload');
 
  $("#content").load( "/host/" + hostid,
    function( response, status, xhr ) {
      if (status == "error") {   
        $("#content").html( "Sorry but there was an error:" + xhr.status + " " + xhr.statusText);
      }
    }
  )
}
</script>

The template looks exactly the same as in WebSockets example, except one single line, the purpose of this one will be explained just a bit later.

$('#content').trigger('unload');

The result of this web page is a simple list of hosts. Whenever user clicks on a host link, the host-specific view will be fetched from the server (using AJAX) and displayed. Next template is the most interesting one, views/host.scala.html, and contains a lot of important details:

@(host: Host)( implicit request: RequestHeader )

<div id="content">
  <div id="chart"></div>
 
  <script type="text/javascript">
    var charts = []   
      charts[ '@host.id' ] = new Highcharts.Chart({                 
        chart: {
          renderTo: 'chart',
          defaultSeriesType: 'spline'            
        },           
        xAxis: {
          type: 'datetime'
        },   
        series: [{
          name: "CPU",
          data: []
        }
      ]
    }); 
  </script>     
</div>

<script type="text/javascript">
  if( !!window.EventSource ) {
    var event = new EventSource("@routes.Application.stats( host.id )");
 
    event.addEventListener('message', function( event ) { 
      var datapoint = jQuery.parseJSON( event.data );
      var chart = charts[ '@host.id' ];
       
      chart.series[ 0 ].addPoint({
        x: datapoint.cpu.timestamp,
        y: datapoint.cpu.load
      }, true, chart.series[ 0 ].data.length >= 50 );
    } );

    $('#content').bind('unload',function() {
      event.close();
    });                         
  }  
</script>

The core UI component is a simple chart, built using Highcharts library. The script block at the bottom tries to create an EventSource object which is an implementation of server-side events on browser side. If browser supports server-side events, the respective connection to server-side endpoint will be created and chart will be updated on every message received from the server ('message' listener). It's a good time to explain the purpose of this construct (and it's counterpart $('#content').trigger('unload') mentioned above):

$('#content').bind('unload',function() {
  event.close();
});

Whenever user clicks on different hosts, the previous event stream should be closed and new one should be created. Not doing so leads to more and more event streams to be created, flooding browser with more and more event listeners. To overcome this, we bind an unload method to a div element with id content and call it all the time when user clicks on a host. By doing that, we close event stream all the time before opening a new one. Enough UI, let's move on to back-end.

The routing table and mostly all the code stay the same, except only two small method changes, Statistics.attach and Application.stats. Let's take a look how server push of host's CPU statistics using server-side events is implemented on controller side (and mapped to /stats/:id URL):

def stats( id: String ) = Action { request =>
  Hosts.hosts.find( _.id == id ) match {
    case Some( host ) =>
      Async { 
        Statistics.attach( host ).map { enumerator =>      
          Ok.stream( enumerator &> EventSource() ).as( "text/event-stream")
        }
      }
    case None => NoContent  
  }
}

Very short piece of code which does a lot of things. After finding the respective host by its id, we "attaching" to it by receiving the Enumerator instance: the continuous flow of CPU statistics data. The Ok.stream( enumerator &> EventSource() ).as( "text/event-stream") will transform this continuous flow of statistics data to stream of events which client is able to consume using server-side events.

To finish with server-side changes, let's take a look how "attaching" to host's statistics flow looks like:

def attach( host: Host ): Future[ Enumerator[ JsValue ] ] = {
  ( actor( host.id ) ? Connect( host ) ).map {      
    case Connected( enumerator ) => enumerator
  }
}

It's as simple as returning the Enumerator, and because we are using Akka actors, it becomes a bit more tricky with Future and asynchronous invocations. And, that's it!

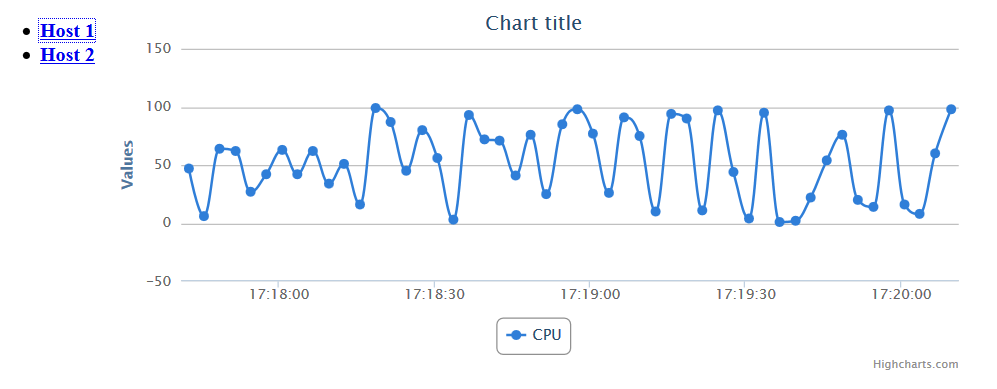
In action our simple application looks like this (using Mozilla Firefox), having only Host 1 and Host 2 as an example:

Very nice and simple, and yet again, thanks a lot to Play Framework guys and the community. Complete source code is available on GitHub.

Wednesday, July 31, 2013

Easy Messaging with STOMP over WebSockets using Apollo

In my previous post I have covered couple of interesting use cases implementing STOMP messaging over Websockects using well-known message brokers, HornetQ and ActiveMQ. But the one I didn't cover is Apollo as in my own opinion its API is verbose and not expressive enough as for a Java developer. Nevertheless, the more time I spent playing with Apollo, more convinced I became that there is quite a potential out there. So this post is all about Apollo.

The problem we're trying to solve stays the same: simple publish/subscribe solution where JavaScript web client sends messages and listens for a specific topic. Whenever any message is received, client shows alert window (please note that we need to use modern browser which supports Websockets, such as Google Chrome or Mozilla Firefox).

Let's make our hands dirty by starting off with index.html (which imports awesome stomp.js JavaScript library):


The client part is not that different except topic name which is now /topic/test. The server side however differs a lot. Apollo is written is Scala and embraces asynchronous, non-blocking programming model. I think, it's a very good thing. What it brings though is a new paradigm to program against and it's also not necessarily a bad thing. The AppConfig class is the one which configures embedded Apollo broker:

package com.example.messaging;

import java.io.File;

import org.apache.activemq.apollo.broker.Broker;
import org.apache.activemq.apollo.broker.jmx.dto.JmxDTO;
import org.apache.activemq.apollo.dto.AcceptingConnectorDTO;
import org.apache.activemq.apollo.dto.BrokerDTO;
import org.apache.activemq.apollo.dto.TopicDTO;
import org.apache.activemq.apollo.dto.VirtualHostDTO;
import org.apache.activemq.apollo.dto.WebAdminDTO;
import org.apache.activemq.apollo.stomp.dto.StompDTO;
import org.springframework.context.annotation.Bean;
import org.springframework.context.annotation.Configuration;

@Configuration
public class AppConfig {
    @Bean
    public Broker broker() throws Exception {
        final Broker broker = new Broker();
    
        // Configure STOMP over WebSockects connector
        final AcceptingConnectorDTO ws = new AcceptingConnectorDTO();
        ws.id = "ws";
        ws.bind = "ws://localhost:61614";  
        ws.protocols.add( new StompDTO() );

        // Create a topic with name 'test'
        final TopicDTO topic = new TopicDTO();
        topic.id = "test";
  
        // Create virtual host (based on localhost)
        final VirtualHostDTO host = new VirtualHostDTO();
        host.id = "localhost";  
        host.topics.add( topic );
        host.host_names.add( "localhost" );
        host.host_names.add( "127.0.0.1" );
        host.auto_create_destinations = false;
  
        // Create a web admin UI (REST) accessible at: http://localhost:61680/api/index.html#!/ 
        final WebAdminDTO webadmin = new WebAdminDTO();
        webadmin.bind = "http://localhost:61680";

        // Create JMX instrumentation 
        final JmxDTO jmxService = new JmxDTO();
        jmxService.enabled = true;
  
        // Finally, glue all together inside broker configuration
        final BrokerDTO config = new BrokerDTO();
        config.connectors.add( ws );
        config.virtual_hosts.add( host );
        config.web_admins.add( webadmin );
        config.services.add( jmxService );
  
        broker.setConfig( config );
        broker.setTmp( new File( System.getProperty( "java.io.tmpdir" ) ) );
  
        broker.start( new Runnable() {   
            @Override
            public void run() {  
                System.out.println("The broker has been started started.");
            }
        } );
  
        return broker;
    }
}

I guess it becomes clear what I meant by verbose and not expressive enough but at least it's easy to follow. Firstly, we are creating Websockects connector at ws://localhost:61614 and asking it to support the STOMP protocol. Then we are creating a simple topic with name test (which we refer as /topic/test on client side). Next important step is to create a virtual host and to bind topics (and queues if any) to it. The host names list is very important as the destination resolution logic heavily relies on it. In the following step we are configuring web admin UI and JMX instrumentation which provides us with access to configuration, statistics and monitoring. To check it out, please open this URL in your web browser once Apollo broker is started. And finally, by applying configuration and starting the broker we are good to go! As you can see, asynchronous programming model leads to callbacks and anonymous functions (where are you, Java 8?).

Now, when configuration is done, it's time to look at start-up logic placed into Starter class (again, callbacks and anonymous functions are used to perform graceful shutdown logic):

package com.example.messaging;

import java.util.concurrent.CountDownLatch;
import java.util.concurrent.TimeUnit;

import org.apache.activemq.apollo.broker.Broker;
import org.springframework.context.annotation.ConfigurableApplicationContext;

public class Starter  {
    public static void main( String[] args ) throws Exception {
        try( ConfigurableApplicationContext context = new AnnotationConfigApplicationContext( AppConfig.class ) ) {
            final Broker broker = context.getBean( Broker.class );  
            System.out.println( "Press any key to terminate ..." );
            System.in.read();    
         
            final CountDownLatch latch = new CountDownLatch( 1 );
            broker.stop( new Runnable() { 
                @Override
                public void run() {  
                    System.out.println("The broker has been stopped.");
                    latch.countDown();
                }
            } );
         
            // Gracefully stop the broker
            if( !latch.await( 1, TimeUnit.SECONDS ) ) {
                System.out.println("The broker hasn't been stopped, exiting anyway ...");
            }
        }
    }
}

As with the previous examples, after running Starter class and opening index.html in the browser, we should see something like that:

Great, it works just fine! I am pretty sure that just rewriting the code in Scala, this Apollo API usage example will look much more compact and concise. In any case, I think Apollo message broker is definitely worth to consider if you are looking for prominent messaging architecture.

All sources are available on GitHub: Apollo example.

Saturday, June 29, 2013

Easy Messaging with STOMP over WebSockets using ActiveMQ and HornetQ

Messaging is an extremely powerful tool for building distributed software systems of different levels. Typically, at least in Java ecosystem, the client (front-end) never interacts with message broker (or exchange) directly but does it by invoking server-side (back-end) services. Or client may not even be aware that there's messaging solution in place.

With Websockets gaining more and more adoption, and wide support of the text-oriented protocols like STOMP (used to communicate with message broker or exchange) are going to make a difference. Today's post will try to explain how simple it is to expose two very popular JMS implementations, Apache ActiveMQ and JBoss HornetQ, to be available to web front-end (JavaScript) using STOMP over Websockets.

Before digging into the code, one might argue that it's not a good idea to do that. So what's the purpose? The answer really depends:

  • you are developing prototype / proof of concept and need easy way to integrate publish/subscribe or peer-to-peer messaging
  • you don't want / need to build sophisticated architecture and the simplest solution which works is just enough
The scalability, fail-over and a lot of other very important decisions are not taken into consideration here but definitely should be if you are developing robust and resilient architecture.

So let's get started. As always, it's better to start with problem we're trying to solve: we would like to develop simple publish/subscribe solution where web client written in JavaScript will be able to send messages and listen for a specific topic. Whenever any message has been received, client just shows simple alert window. Please note that we need to use modern browser which supports Websockets, such as Google Chrome or Mozilla Firefox.

For both our examples client's code remains the same and so let's start with that. The great starting point is STOMP Over WebSocket article which introduces the stomp.js module and here is our index.html:


Extremely simple code but few details are worth to explain. First, we are looking for Websockets endpoint at ws://localhost:61614/stomp. It's sufficient for local deployment but better to replace localhost with real IP address or host name. Secondly, once connected, client subscribes to the topic (only interested in messages with priority: 9) and publishes the message to this topic immediately after. From client prospective, we are done.

Let's move on to message broker and our first one in list is Apache ActiveMQ. To make the example simple, we will embed Apache ActiveMQ broker into simple Spring application without using configuration XML files. As source code is available on GitHub, I will skip the POM file snippet and just show the code:

package com.example.messaging;

import java.util.Collections;

import org.apache.activemq.broker.BrokerService;
import org.apache.activemq.broker.jmx.ManagementContext;
import org.apache.activemq.command.ActiveMQDestination;
import org.apache.activemq.command.ActiveMQTopic;
import org.apache.activemq.hooks.SpringContextHook;
import org.springframework.context.annotation.Bean;
import org.springframework.context.annotation.Configuration;

@Configuration
public class AppConfig {
    @Bean( initMethod = "start", destroyMethod = "stop" )
    public BrokerService broker() throws Exception {
        final BrokerService broker = new BrokerService();    
        broker.addConnector( "ws://localhost:61614" ); 
        broker.setPersistent( false );
        broker.setShutdownHooks( Collections.< Runnable >singletonList( new SpringContextHook() ) );
  
        final ActiveMQTopic topic = new ActiveMQTopic( "jms.topic.test" );
        broker.setDestinations( new ActiveMQDestination[] { topic }  );
  
        final ManagementContext managementContext = new ManagementContext();
        managementContext.setCreateConnector( true );
        broker.setManagementContext( managementContext );
  
        return broker;
    }
}

As we can see, the ActiveMQ broker is configured with ws://localhost:61614 connector which assumes using STOMP protocol. Also, we are creating JMS topic with name jms.topic.test and enabling JMX management instrumentation. And to run it, simple Starter class:

package com.example.messaging;

import org.springframework.context.ApplicationContext;
import org.springframework.context.annotation.AnnotationConfigApplicationContext;

public class Starter  {
    public static void main( String[] args ) {
        ApplicationContext context = new AnnotationConfigApplicationContext( AppConfig.class );
    }
}

Now, having it up and running, let's open index.html file in browser, we should see something like that:

Simple! For curious readers, ActiveMQ uses Jetty 7.6.7.v20120910 for Websockets support and won't work with latest Jetty distributions.

Moving on, with respect to HornetQ the implementations looks a bit different though not very complicated as well. As Starter class remains the same, the only change is the configuration:

package com.example.hornetq;

import java.util.Collections;
import java.util.HashMap;
import java.util.Map;

import org.hornetq.api.core.TransportConfiguration;
import org.hornetq.core.config.impl.ConfigurationImpl;
import org.hornetq.core.remoting.impl.netty.NettyAcceptorFactory;
import org.hornetq.core.remoting.impl.netty.TransportConstants;
import org.hornetq.core.server.JournalType;
import org.hornetq.jms.server.config.ConnectionFactoryConfiguration;
import org.hornetq.jms.server.config.JMSConfiguration;
import org.hornetq.jms.server.config.TopicConfiguration;
import org.hornetq.jms.server.config.impl.ConnectionFactoryConfigurationImpl;
import org.hornetq.jms.server.config.impl.JMSConfigurationImpl;
import org.hornetq.jms.server.config.impl.TopicConfigurationImpl;
import org.hornetq.jms.server.embedded.EmbeddedJMS;
import org.springframework.context.annotation.Bean;
import org.springframework.context.annotation.Configuration;

@Configuration
public class AppConfig {
    @Bean( initMethod = "start", destroyMethod = "stop" )
    public EmbeddedJMS broker() throws Exception {
        final ConfigurationImpl configuration = new ConfigurationImpl();
        configuration.setPersistenceEnabled( false );
        configuration.setJournalType( JournalType.NIO );
        configuration.setJMXManagementEnabled( true );
        configuration.setSecurityEnabled( false );
  
        final Map< String, Object > params = new HashMap<>();
        params.put( TransportConstants.HOST_PROP_NAME, "localhost" );
        params.put( TransportConstants.PROTOCOL_PROP_NAME, "stomp_ws" );
        params.put( TransportConstants.PORT_PROP_NAME, "61614" );
  
        final TransportConfiguration stomp = new TransportConfiguration( NettyAcceptorFactory.class.getName(), params );
        configuration.getAcceptorConfigurations().add( stomp );
        configuration.getConnectorConfigurations().put( "stomp_ws", stomp );
  
        final ConnectionFactoryConfiguration cfConfig = new ConnectionFactoryConfigurationImpl( "cf", true, "/cf" );
        cfConfig.setConnectorNames( Collections.singletonList( "stomp_ws" ) );
  
        final JMSConfiguration jmsConfig = new JMSConfigurationImpl();
        jmsConfig.getConnectionFactoryConfigurations().add( cfConfig );
  
        final TopicConfiguration topicConfig = new TopicConfigurationImpl( "test", "/topic/test" );
        jmsConfig.getTopicConfigurations().add( topicConfig );
  
        final EmbeddedJMS jmsServer = new EmbeddedJMS();
        jmsServer.setConfiguration( configuration );
        jmsServer.setJmsConfiguration( jmsConfig );
  
        return jmsServer;
    }
}

The complete source code is on GitHub. After running Starter class and openning index.html in browser, we should see very similar results:

HornetQ configuration looks a bit more verbose, however there are no additional dependencies involved except brilliant Netty framework.

For my own curiosity, I replaced the ActiveMQ broker with Apollo implementation. Though I succeeded with making it works as expected, I found the API to be very cumbersome, at least in current version 1.6, so I haven't covered it in this post.

All sources are available on GitHub: Apache ActiveMQ example and JBoss HornetQ example

Monday, May 27, 2013

Real-time charts with Play Framework and Scala: extreme productivity on JVM for web

Being a hardcore back-end developer, whenever I am thinking about building web application with some UI on JVM platform, I feel scared. And there are reasons for that: having experience with JSF, Liferay, Grails, ... I don't want to go this road anymore. But if a need comes, is there a choice, really? I found one which I think is awesome: Play Framework.

Built on top of JVM, Play Framework allows to create web applications using Java or Scala with literally no efforts. The valuable and distinguishing differences it provides: static compilation (even for page templates), easy to start with, and concise (more about it here).

To demonstrate how amazing Play Framework is, I would like to share my experience with developing simple web application. Let's assume we have couple of hosts and we would like to watch CPU usage on each one in real-time (on a chart). When one hears "real-time", it may mean different things but in context of our application it means: using WebSockets to push data from server to client. Though Play Framework supports pure Java API, I will use some Scala instead as it makes code very compact and clear.

Let's get started! After downloading Play Framework (the latest version on the moment of writing was 2.1.1), let's create our app by typing

play new play-websockets-example
and selecting Scala as a primary language. No wonders here: it's a pretty standard way nowadays, right?

Having our application ready, next step would be to create some starting web page. Play Framework uses own type safe template engine based on Scala, it has a couple of extremely simple rules and is very easy to get started with. Here is an example of views/dashboard.scala.html:

@(title: String, hosts: List[Host])

<!DOCTYPE html>
<html>
  <head>
    <title>@title</title>
    <link rel="stylesheet" media="screen" href="@routes.Assets.at("stylesheets/main.css")">
    <link rel="shortcut icon" type="image/png" href="@routes.Assets.at("images/favicon.png")">
    <script src="@routes.Assets.at("javascripts/jquery-1.9.0.min.js")" type="text/javascript">
    <script src="@routes.Assets.at("javascripts/highcharts.js")" type="text/javascript">
  </head>
    
  <body>
    <div id="hosts">
      <ul class="hosts">
        @hosts.map { host =>
        <li>               
          <a href="#" onclick="javascript:show( '@host.id' )"><b>@host.name</b></a>
        </li>
        }
      </ul>
    </div>
  
    <div id="content">
    </div>
  </body>
</html>

<script type="text/javascript">
function show( hostid ) {
  $("#content").load( "/host/" + hostid,
    function( response, status, xhr ) {
      if (status == "error") {
        $("#content").html( "Sorry but there was an error:" + xhr.status + " " + xhr.statusText);
      }
    }
  )
}
</script>

Aside from coupe of interesting constructs (which are very well described here), it looks pretty like regular HTML with a bit of JavaScript. The result of this web page is a simple list of hosts in the browser. Whenever user clicks on a particular host, another view will be fetched from the server (using old buddy AJAX) and displayed on right side from the host. Here is the second (and the last) template, views/host.scala.html:

@(host: Host)( implicit request: RequestHeader )

<div id="content">
  <div id="chart">
  <script type="text/javascript">
    var charts = []   
    charts[ '@host.id' ] = new Highcharts.Chart({                 
      chart: {
        renderTo: 'chart',
        defaultSeriesType: 'spline'            
      },           
      xAxis: {
        type: 'datetime'
      },   
      series: [{
        name: "CPU",
        data: []
      }]
    }); 
  </script>
</div>

<script type="text/javascript">
var socket = new WebSocket("@routes.Application.stats( host.id ).webSocketURL()")
socket.onmessage = function( event ) { 
  var datapoint = jQuery.parseJSON( event.data );
  var chart = charts[ '@host.id' ]
  
  chart.series[ 0 ].addPoint({
    x: datapoint.cpu.timestamp,
    y: datapoint.cpu.load
  }, true, chart.series[ 0 ].data.length >= 50 );
}
</script>

It's looks rather as a fragment, not a complete HTML page, which has only a chart and opens the WebSockets connection with a listener. With an enormous help of Highcharts and jQuery, JavaScript programming hasn't ever been so easy for back-end developers as it's now. At this moment, the UI part is completely done. Let's move on to back-end side.

Firstly, let's define the routing table which includes only three URLs and by default is located at conf/routes:

GET     /                           controllers.Application.index
GET     /host/:id                   controllers.Application.host( id: String )
GET     /stats/:id                  controllers.Application.stats( id: String )

Having views and routes defined, it's time to fill up the last and most interesting part, the controllers which glue all parts together (actually, only one controller, controllers/Application.scala). Here is a snippet which maps index action to the view templated by views/dashboard.scala.html, it's as easy as that:

def index = Action {
  Ok( views.html.dashboard( "Dashboard", Hosts.hosts() ) )
}

The interpretation of this action may sound like that: return successful response code and render template views/dashboard.scala.html with two parameters, title and hosts, as response body. The action to handle /host/:id looks much the same:

def host( id: String ) = Action { implicit request =>
  Hosts.hosts.find( _.id == id ) match {
    case Some( host ) => Ok( views.html.host( host ) )
    case None => NoContent
  }    
}

And here is a Hosts object defined in models/Hosts.scala. For simplicity, the list of hosts is hard-coded:

package models

case class Host( id: String, name: String )

object Hosts {  
  def hosts(): List[ Host ] = {
    return List( new Host( "h1", "Host 1" ), new Host( "h2", "Host 2" ) )
  } 
}

The boring part is over, let's move on to the last but not least implementation: server push of host's CPU statistics using WebSockets. As you can see, the /stats/:id URL is already mapped to controller action so let's take a look on its implementation:

def stats( id: String ) = WebSocket.async[JsValue] { request =>
  Hosts.hosts.find( _.id == id ) match {
    case Some( host ) => Statistics.attach( host )
    case None => {
      val enumerator = Enumerator
        .generateM[JsValue]( Promise.timeout( None, 1.second ) )
        .andThen( Enumerator.eof )
      Promise.pure( ( Iteratee.ignore[JsValue], enumerator ) )
    }
  }
}

Not too much code here but in case you are curious about WebSockets in Play Framework please follow this link. This couple of lines may look a bit weird at first but once you read the documentation and understand basic design principles behind Play Framework, it will look much more familiar and friendly. The Statistics object is the one who does the real job, let's take a look on the code:

package models

import scala.concurrent.Future
import scala.concurrent.duration.DurationInt

import akka.actor.ActorRef
import akka.actor.Props
import akka.pattern.ask
import akka.util.Timeout
import play.api.Play.current
import play.api.libs.concurrent.Akka
import play.api.libs.concurrent.Execution.Implicits.defaultContext
import play.api.libs.iteratee.Enumerator
import play.api.libs.iteratee.Iteratee
import play.api.libs.json.JsValue

case class Refresh()
case class Connect( host: Host )
case class Connected( enumerator: Enumerator[ JsValue ] )

object Statistics {
  implicit val timeout = Timeout( 5 second )
  var actors: Map[ String, ActorRef ] = Map()
  
  def actor( id: String ) = actors.synchronized {
    actors.find( _._1 == id ).map( _._2 ) match {
      case Some( actor ) => actor      
      case None => {
        val actor = Akka.system.actorOf( Props( new StatisticsActor(id) ), name = s"host-$id" )   
        Akka.system.scheduler.schedule( 0.seconds, 3.second, actor, Refresh )
        actors += ( id -> actor )
        actor
      }
    }
  }
 
  def attach( host: Host ): Future[ ( Iteratee[ JsValue, _ ], Enumerator[ JsValue ] ) ] = {
    ( actor( host.id ) ? Connect( host ) ).map {      
      case Connected( enumerator ) => ( Iteratee.ignore[JsValue], enumerator )
    }
  }
}

As always, thanks to Scala conciseness, not too much code but a lot of things are going on. As we may have hundreds of hosts, it would be reasonable to dedicate to each host own worker (not a thread) or, more precisely, own actor. For that, we will use another amazing library called Akka. The code snippet above just creates an actor for the host or uses existing one from the registry of the already created actors. Please note that the implementation is quite simplified and leaves off important details. The thoughts in right direction would be using supervisors and other advanced concepts instead of synchronized block. Also worth mentioning that we would like to make our actor a scheduled task: we ask actor system to send the actor a message Refresh every 3 seconds. That means that the charts will be updated with new values every three seconds as well.

So, when actor for a host is created, we send him a message Connect notifying that a new connection is being established. When response message Connected is received, we return from the method and at this point connection over WebSockets is about to be established. Please note that we intentionally ignore any input from the client by using Iteratee.ignore[JsValue].

And here is the StatisticsActor implementation:

package models

import java.util.Date

import scala.util.Random

import akka.actor.Actor
import play.api.libs.iteratee.Concurrent
import play.api.libs.json.JsNumber
import play.api.libs.json.JsObject
import play.api.libs.json.JsString
import play.api.libs.json.JsValue

class StatisticsActor( hostid: String ) extends Actor {
  val ( enumerator, channel ) = Concurrent.broadcast[JsValue]
  
  def receive = {
    case Connect( host ) => sender ! Connected( enumerator )       
    case Refresh => broadcast( new Date().getTime(), hostid )
  }
  
  def broadcast( timestamp: Long, id: String ) {
    val msg = JsObject( 
      Seq( 
        "id" -> JsString( id ),
        "cpu" -> JsObject( 
          Seq( 
            ( "timestamp" -> JsNumber( timestamp ) ), 
            ( "load" -> JsNumber( Random.nextInt( 100 ) ) ) 
          ) 
        )
      )
    )
     
    channel.push( msg )
  }
}

The CPU statistics is randomly generated and the actor just broadcasts it every 3 seconds as simple JSON object. On the client side, the JavaScript code parses this JSON and updates the chart. Here is how it looks like for two hosts, Host 1 and Host 2 in Mozilla Firefox:

To finish up, I am personally very excited with what I've done so far with Play Framework. It took just couple of hours to get started and another couple of hours to make things work as expected. The errors reporting and feedback cycle from running application are absolutely terrific, thanks a lot to Play Framework guys and the community around it. There are still a lot of things to learn for me but it worth doing it.

Please find the complete source code on GitHub.

Saturday, April 20, 2013

Fault Injection with Byteman and JUnit: do even more to ensure robustness of your applications

The time when our applications lived in isolation have passed long-long ago. Nowadays applications are a very complicated beasts talking to each other using myriads of APIs and protocols, storing data in traditional or NoSQL databases, sending messages and events over the wire ...

How often did you think about what will happen if, for example, a database goes down when your application is actively querying it? Or some API endpoint suddenly starts to refuse connection? Wouldn't it be nice to have such accidents covered as part of your test suite? That's what fault injection and Byteman framework are about.

As an example, we will build a realistic, full-blown Spring application which uses Hibernate/JPA to access MySQL database and manages customers. As part of application's JUnit integration test suite, we will include three kind of test cases:

  • store / find a customer
  • store customer and try to query database when it's down (fault simulation)
  • store customer and a database query times out (fault simulation)

There are only two preconditions for application to run on your local development box:

  • MySQL server is installed and has customers database
  • Oracle JDK is installed and JAVA_HOME environment variable points to it
That's being said, we are ready to go.

First, let's describe our domain model which consists from single class Customer with id and single property name. It looks as simple as that:

package com.example.spring.domain;

import java.io.Serializable;

import javax.persistence.Column;
import javax.persistence.Entity;
import javax.persistence.GeneratedValue;
import javax.persistence.Id;
import javax.persistence.Table;

@Entity
@Table( name = "customers" )
public class Customer implements Serializable{
    private static final long serialVersionUID = 1L;

    @Id
    @GeneratedValue
    @Column(name = "id", unique = true, nullable = false)
    private long id;
 
    @Column(name = "name", nullable = false)
    private String name;
  
    public Customer() {
    }
 
    public Customer( final String name ) {
        this.name = name;
    }

    public long getId() {
        return this.id;
    }

    protected void setId( final long id ) {
        this.id = id;
    }
 
    public String getName() {
        return this.name;
    }

    public void setName( final String name ) {
        this.name = name;
    }
}

For simplicity, the servicing layer is mixed with data access layer and calls database directly. Here is our CustomerService implementation:

package com.example.spring.services;

import javax.persistence.EntityManager;
import javax.persistence.PersistenceContext;

import org.springframework.stereotype.Service;
import org.springframework.transaction.annotation.Transactional;

import com.example.spring.domain.Customer;

@Service
public class CustomerService {
    @PersistenceContext private EntityManager entityManager;
 
    @Transactional( readOnly = true )
    public Customer find( long id ) {
        return this.entityManager.find( Customer.class, id );
    }

    @Transactional( readOnly = false )
    public Customer create( final String name ) {
        final Customer customer = new Customer( name );
        this.entityManager.persist(customer);
        return customer;
    }
 
    @Transactional( readOnly = false )
    public void deleteAll() {
        this.entityManager.createQuery( "delete from Customer" ).executeUpdate();
    }
}

And lastly, the Spring application context which defines data source and transaction manager. A small note here: as we won't introduce data access layer (@Repository) classes, in order for Spring to perform exception translation properly we define PersistenceExceptionTranslationPostProcessor instance to post-process service classes (@Service). Everything else should be very familiar.

package com.example.spring.config;

import java.util.Properties;

import javax.sql.DataSource;

import org.hibernate.dialect.MySQL5InnoDBDialect;
import org.springframework.context.annotation.Bean;
import org.springframework.context.annotation.ComponentScan;
import org.springframework.context.annotation.Configuration;
import org.springframework.dao.annotation.PersistenceExceptionTranslationPostProcessor;
import org.springframework.jdbc.datasource.DriverManagerDataSource;
import org.springframework.orm.jpa.JpaTransactionManager;
import org.springframework.orm.jpa.LocalContainerEntityManagerFactoryBean;
import org.springframework.orm.jpa.vendor.Database;
import org.springframework.orm.jpa.vendor.HibernateJpaVendorAdapter;
import org.springframework.stereotype.Service;
import org.springframework.transaction.PlatformTransactionManager;
import org.springframework.transaction.annotation.EnableTransactionManagement;

import com.example.spring.services.CustomerService;

@EnableTransactionManagement
@Configuration
@ComponentScan( basePackageClasses = CustomerService.class )
public class AppConfig {
    @Bean
    public PersistenceExceptionTranslationPostProcessor exceptionTranslationPostProcessor() {
        final PersistenceExceptionTranslationPostProcessor processor = new PersistenceExceptionTranslationPostProcessor();
        processor.setRepositoryAnnotationType( Service.class );
        return processor;
    }

    @Bean
    public HibernateJpaVendorAdapter hibernateJpaVendorAdapter() {
        final HibernateJpaVendorAdapter adapter = new HibernateJpaVendorAdapter();

        adapter.setDatabase( Database.MYSQL );
        adapter.setShowSql( false );

        return adapter;
    }

    @Bean
    public LocalContainerEntityManagerFactoryBean entityManager() throws Throwable {
        final LocalContainerEntityManagerFactoryBean entityManager = new LocalContainerEntityManagerFactoryBean();
     
        entityManager.setPersistenceUnitName( "customers" );
        entityManager.setDataSource( dataSource() );
        entityManager.setJpaVendorAdapter( hibernateJpaVendorAdapter() );

        final Properties properties = new Properties();
        properties.setProperty("hibernate.dialect", MySQL5InnoDBDialect.class.getName());
        properties.setProperty("hibernate.hbm2ddl.auto", "create-drop" );
        entityManager.setJpaProperties( properties );

        return entityManager;
    }

    @Bean
    public DataSource dataSource() {
        final DriverManagerDataSource dataSource = new DriverManagerDataSource();

        dataSource.setDriverClassName( com.mysql.jdbc.Driver.class.getName() );
        dataSource.setUrl( "jdbc:mysql://localhost/customers?enableQueryTimeouts=true" );
        dataSource.setUsername( "root" );
        dataSource.setPassword( "" );

        return dataSource;
    }

    @Bean
    public PlatformTransactionManager transactionManager() throws Throwable {
        return new JpaTransactionManager( this.entityManager().getObject() );
    }
}

Now let's add a simple JUnit test case to verify our Spring application actually works as expected. Before doing that, the database customers should be created:

> mysql -u root
mysql> create database customers;
Query OK, 1 row affected (0.00 sec)

And here is a CustomerServiceTestCase which for now has single test to create the customer and verify it's actually has been created.

package com.example.spring;

import static org.hamcrest.CoreMatchers.notNullValue;
import static org.junit.Assert.assertThat;

import javax.inject.Inject;

import org.junit.After;
import org.junit.Test;
import org.junit.runner.RunWith;
import org.springframework.test.context.ContextConfiguration;
import org.springframework.test.context.junit4.SpringJUnit4ClassRunner;
import org.springframework.test.context.support.AnnotationConfigContextLoader;

import com.example.spring.config.AppConfig;
import com.example.spring.domain.Customer;
import com.example.spring.services.CustomerService;

@RunWith( SpringJUnit4ClassRunner.class )
@ContextConfiguration(loader = AnnotationConfigContextLoader.class, classes = { AppConfig.class } )
public class CustomerServiceTestCase {
    @Inject private CustomerService customerService; 
 
    @After
    public void tearDown() {
        customerService.deleteAll();
    }

    @Test
    public void testCreateCustomerAndVerifyItHasBeenCreated() throws Exception {
        Customer customer = customerService.create( "Customer A" );
        assertThat( customerService.find( customer.getId() ), notNullValue() );
    }
}

That looks simple and straightforward. Now, let's think about scenario when customer creation succeeded but find fails because of query timeout. To do that, we need a help from Byteman.

In short, Byteman is bytecode manipulation framework. It's a Java agent implementation which runs with JVM (or attaches to it) and modifies running application bytecode as such changing its behavior. Byteman has a very good documentation and own rich set of rule definitions to perform mostly everything developer can come up with. Also, it has pretty good integration with JUnit framework. On that subject, Byteman tests are supposed to be run with @RunWith( BMUnitRunner.class ), but we already using @RunWith( SpringJUnit4ClassRunner.class ) and JUnit doesn't allow multiple test runners to be specified. Looks like a problem unless you are familiar with JUnit @Rule mechanics. It turns out that converting BMUnitRunner to JUnit rule is quite easy task:

package com.example.spring;

import org.jboss.byteman.contrib.bmunit.BMUnitRunner;
import org.junit.rules.MethodRule;
import org.junit.runners.model.FrameworkMethod;
import org.junit.runners.model.InitializationError;
import org.junit.runners.model.Statement;

public class BytemanRule extends BMUnitRunner implements MethodRule {
    public static BytemanRule create( Class< ? > klass ) {
        try {
            return new BytemanRule( klass ); 
        } catch( InitializationError ex ) { 
            throw new RuntimeException( ex ); 
        }
    }
 
    private BytemanRule( Class klass ) throws InitializationError {
        super( klass );
    }
 
    @Override
    public Statement apply( final Statement statement, final FrameworkMethod method, final Object target ) {
        Statement result = addMethodMultiRuleLoader( statement, method ); 
  
        if( result == statement ) {
            result = addMethodSingleRuleLoader( statement, method );
        }

        return result;
    }
}

And JUnit @Rule injection is as simple as that:

@Rule public BytemanRule byteman = BytemanRule.create( CustomerServiceTestCase.class );

Easy, right? The scenario we mentioned before could be rephrased a bit: when JDBC statement to select from 'customers' table is executed, we should fail with timeout exception. Here is how it looks like as JUnit test case with additional Byteman annotations:

    @Test( expected = DataAccessException.class )
    @BMRule(
        name = "introduce timeout while accessing MySQL database",
        targetClass = "com.mysql.jdbc.PreparedStatement",
        targetMethod = "executeQuery",
        targetLocation = "AT ENTRY",
        condition = "$0.originalSql.startsWith( \"select\" ) && !flagged( \"timeout\" )",
        action = "flag( \"timeout\" ); throw new com.mysql.jdbc.exceptions.MySQLTimeoutException( \"Statement timed out (simulated)\" )"
    )
    public void testCreateCustomerWhileDatabaseIsTimingOut()  {
        Customer customer = customerService.create( "Customer A" );
        customerService.find( customer.getId() );
    }

We could read it like this: "When someone calls executeQuery method of PreparedStatement class and query starts with 'SELECT' than MySQLTimeoutException will be thrown, and it should happen only once (controlled by timeout flag)". Running this test case prints stacktrace in a console and expects DataAccessException to be thrown:

com.mysql.jdbc.exceptions.MySQLTimeoutException: Statement timed out (simulated)
 at sun.reflect.NativeConstructorAccessorImpl.newInstance0(Native Method) ~[na:1.7.0_21]
 at sun.reflect.NativeConstructorAccessorImpl.newInstance(NativeConstructorAccessorImpl.java:57) ~[na:1.7.0_21]
 at sun.reflect.DelegatingConstructorAccessorImpl.newInstance(DelegatingConstructorAccessorImpl.java:45) ~[na:1.7.0_21]
 at java.lang.reflect.Constructor.newInstance(Constructor.java:525) ~[na:1.7.0_21]
 at org.jboss.byteman.rule.expression.ThrowExpression.interpret(ThrowExpression.java:231) ~[na:na]
 at org.jboss.byteman.rule.Action.interpret(Action.java:144) ~[na:na]
 at org.jboss.byteman.rule.helper.InterpretedHelper.fire(InterpretedHelper.java:169) ~[na:na]
 at org.jboss.byteman.rule.helper.InterpretedHelper.execute0(InterpretedHelper.java:137) ~[na:na]
 at org.jboss.byteman.rule.helper.InterpretedHelper.execute(InterpretedHelper.java:100) ~[na:na]
 at org.jboss.byteman.rule.Rule.execute(Rule.java:682) ~[na:na]
 at org.jboss.byteman.rule.Rule.execute(Rule.java:651) ~[na:na]
 at com.mysql.jdbc.PreparedStatement.executeQuery(PreparedStatement.java) ~[mysql-connector-java-5.1.24.jar:na]
 at org.hibernate.engine.jdbc.internal.ResultSetReturnImpl.extract(ResultSetReturnImpl.java:56) ~[hibernate-core-4.2.0.Final.jar:4.2.0.Final]
 at org.hibernate.loader.Loader.getResultSet(Loader.java:2031) [hibernate-core-4.2.0.Final.jar:4.2.0.Final]

Looks good, what about another scenario: customer creation succeeded but find fails because the database went down? This one is a bit more complicated but easy to do anyway, let's take a look:

@Test( expected = CannotCreateTransactionException.class )
@BMRules(
    rules = {
        @BMRule(
            name="create countDown for AbstractPlainSocketImpl",
            targetClass = "java.net.AbstractPlainSocketImpl",
            targetMethod = "getOutputStream",
            condition = "$0.port==3306",
            action = "createCountDown( \"connection\", 1 )"
        ),
        @BMRule(
            name = "throw IOException when trying to execute 2nd query to MySQL",
            targetClass = "java.net.AbstractPlainSocketImpl",
            targetMethod = "getOutputStream",
            condition = "$0.port==3306 && countDown( \"connection\" )",
            action = "throw new java.io.IOException( \"Connection refused (simulated)\" )"
        )
    }
)
public void testCreateCustomerAndTryToFindItWhenDatabaseIsDown() {
    Customer customer = customerService.create( "Customer A" );
    customerService.find( customer.getId() );
}

Let me explain what's going on here. We would like to sit on socket level and actually control the communication as close to network as we can, not on JDBC driver level. That's why we instrumenting AbstractPlainSocketImpl. We also know that MySQL's default port is 3306 so we are instrumenting only sockets opened on this port. Another fact, we know that first created socket corresponds to customer creation and we should let it go through. But second one corresponds to find and must fail. The createCountDown named "connection" serves this purposes: the first call goes through (latch doesn't count to zero yet) but second call triggers MySQLTimeoutException exception. Running this test case prints stacktrace in a console and expects CannotCreateTransactionException to be thrown:

Caused by: java.io.IOException: Connection refused (simulated)
 at sun.reflect.NativeConstructorAccessorImpl.newInstance0(Native Method) ~[na:1.7.0_21]
 at sun.reflect.NativeConstructorAccessorImpl.newInstance(NativeConstructorAccessorImpl.java:57) ~[na:1.7.0_21]
 at sun.reflect.DelegatingConstructorAccessorImpl.newInstance(DelegatingConstructorAccessorImpl.java:45) ~[na:1.7.0_21]
 at java.lang.reflect.Constructor.newInstance(Constructor.java:525) ~[na:1.7.0_21]
 at org.jboss.byteman.rule.expression.ThrowExpression.interpret(ThrowExpression.java:231) ~[na:na]
 at org.jboss.byteman.rule.Action.interpret(Action.java:144) ~[na:na]
 at org.jboss.byteman.rule.helper.InterpretedHelper.fire(InterpretedHelper.java:169) ~[na:na]
 at org.jboss.byteman.rule.helper.InterpretedHelper.execute0(InterpretedHelper.java:137) ~[na:na]
 at org.jboss.byteman.rule.helper.InterpretedHelper.execute(InterpretedHelper.java:100) ~[na:na]
 at org.jboss.byteman.rule.Rule.execute(Rule.java:682) ~[na:na]
 at org.jboss.byteman.rule.Rule.execute(Rule.java:651) ~[na:na]
 at java.net.AbstractPlainSocketImpl.getOutputStream(AbstractPlainSocketImpl.java) ~[na:1.7.0_21]
 at java.net.PlainSocketImpl.getOutputStream(PlainSocketImpl.java:214) ~[na:1.7.0_21]
 at java.net.Socket$3.run(Socket.java:915) ~[na:1.7.0_21]
 at java.net.Socket$3.run(Socket.java:913) ~[na:1.7.0_21]
 at java.security.AccessController.doPrivileged(Native Method) ~[na:1.7.0_21]
 at java.net.Socket.getOutputStream(Socket.java:912) ~[na:1.7.0_21]
 at com.mysql.jdbc.MysqlIO.(MysqlIO.java:330) ~[mysql-connector-java-5.1.24.jar:na]

Great! The possibilities Byteman provides for different fault simulations are enormous. Carefully adding test suites to verify how application reacts to erroneous conditions greatly improves application robustness and resiliency to failures. Bunch of thanks to Byteman guys!

Please find the complete project on GitHub.

Monday, March 4, 2013

Expressive JAX-RS integration testing with Specs2 and client API 2.0

No doubts, JAX-RS is an outstanding piece of technology. And upcoming specification JAX-RS 2.0 brings even more great features, especially concerning client API. Topic of today's post is integration testing of the JAX-RS services.

There are a bunch of excellent test frameworks like REST-assured to help with that, but the way I would like to present it is by using expressive BDD style. Here is an example of what I mean by that:

    Create new person with email <a@b.com>
     Given REST client for application deployed at http://localhost:8080
        When I do POST to rest/api/people?email=a@b.com&firstName=Tommy&lastName=Knocker
        Then I expect HTTP code 201

Looks like typical Given/When/Then style of modern BDD frameworks. How close we can get to this on JVM, using statically compiled language? It turns out, very close, thanks to great specs2 test harness.

One thing to mention, specs2 is a Scala framework. Though we are going to write a bit of Scala, we will do it in a very intuitive way, familiar to experienced Java developer. The JAX-RS service under the test is the one we've developed in previous post. Here it is:

package com.example.rs;

import java.util.Collection;

import javax.inject.Inject;
import javax.ws.rs.DELETE;
import javax.ws.rs.DefaultValue;
import javax.ws.rs.FormParam;
import javax.ws.rs.GET;
import javax.ws.rs.POST;
import javax.ws.rs.PUT;
import javax.ws.rs.Path;
import javax.ws.rs.PathParam;
import javax.ws.rs.Produces;
import javax.ws.rs.QueryParam;
import javax.ws.rs.core.Context;
import javax.ws.rs.core.MediaType;
import javax.ws.rs.core.Response;
import javax.ws.rs.core.UriInfo;

import com.example.model.Person;
import com.example.services.PeopleService;

@Path( "/people" ) 
public class PeopleRestService {
    @Inject private PeopleService peopleService;
 
    @Produces( { MediaType.APPLICATION_JSON } )
    @GET
    public Collection< Person > getPeople( @QueryParam( "page") @DefaultValue( "1" ) final int page ) {
        return peopleService.getPeople( page, 5 );
    }

    @Produces( { MediaType.APPLICATION_JSON } )
    @Path( "/{email}" )
    @GET
    public Person getPeople( @PathParam( "email" ) final String email ) {
        return peopleService.getByEmail( email );
    }

    @Produces( { MediaType.APPLICATION_JSON  } )
    @POST
    public Response addPerson( @Context final UriInfo uriInfo,
            @FormParam( "email" ) final String email, 
            @FormParam( "firstName" ) final String firstName, 
            @FormParam( "lastName" ) final String lastName ) {
  
        peopleService.addPerson( email, firstName, lastName );
        return Response.created( uriInfo.getRequestUriBuilder().path( email ).build() ).build();
    }
 
    @Produces( { MediaType.APPLICATION_JSON  } )
    @Path( "/{email}" )
    @PUT
    public Person updatePerson( @PathParam( "email" ) final String email, 
            @FormParam( "firstName" ) final String firstName, 
            @FormParam( "lastName" )  final String lastName ) {
  
        final Person person = peopleService.getByEmail( email );  
        if( firstName != null ) {
            person.setFirstName( firstName );
        }
  
        if( lastName != null ) {
            person.setLastName( lastName );
        }

        return person;     
    }
 
    @Path( "/{email}" )
    @DELETE
    public Response deletePerson( @PathParam( "email" ) final String email ) {
        peopleService.removePerson( email );
        return Response.ok().build();
    }
}
Very simple JAX-RS service to manage people. All basic HTTP verbs are present and backed by Java implementation: GET, PUT, POST and DELETE. To be complete, let me also include some methods of the service layer as these ones raise some exceptions of our interest.
package com.example.services;

import java.util.ArrayList;
import java.util.Collection;
import java.util.Iterator;
import java.util.concurrent.ConcurrentHashMap;
import java.util.concurrent.ConcurrentMap;

import org.springframework.stereotype.Service;

import com.example.exceptions.PersonAlreadyExistsException;
import com.example.exceptions.PersonNotFoundException;
import com.example.model.Person;

@Service
public class PeopleService {
    private final ConcurrentMap< String, Person > persons = new ConcurrentHashMap< String, Person >(); 
  
    // ...
      
    public Person getByEmail( final String email ) {
        final Person person = persons.get( email );  
        
        if( person == null ) {
            throw new PersonNotFoundException( email );
        }
  
        return person;
    }

    public Person addPerson( final String email, final String firstName, final String lastName ) {
        final Person person = new Person( email );
        person.setFirstName( firstName );
        person.setLastName( lastName );
    
        if( persons.putIfAbsent( email, person ) != null ) {
            throw new PersonAlreadyExistsException( email );
        }
  
        return person;
    }
 
    public void removePerson( final String email ) {
        if( persons.remove( email ) == null ) {
            throw new PersonNotFoundException( email );
        }
    }
}
Very simple but working implementation based on ConcurrentMap. The PersonNotFoundException is being raised in a case when person with requested e-mail doesn't exist. Respectively, the PersonAlreadyExistsException is being raised in a case when person with requested e-mail already exists. Each of those exceptions have a counterpart among HTTP codes: 404 NOT FOUND and 409 CONFLICT. And it's the way we are telling JAX-RS about that:
package com.example.exceptions;

import javax.ws.rs.WebApplicationException;
import javax.ws.rs.core.Response;
import javax.ws.rs.core.Response.Status;

public class PersonAlreadyExistsException extends WebApplicationException {
    private static final long serialVersionUID = 6817489620338221395L;

    public PersonAlreadyExistsException( final String email ) {
        super(
            Response
                .status( Status.CONFLICT )
                .entity( "Person already exists: " + email )
                .build()
        );
    }
}
package com.example.exceptions;

import javax.ws.rs.WebApplicationException;
import javax.ws.rs.core.Response;
import javax.ws.rs.core.Response.Status;

public class PersonNotFoundException extends WebApplicationException {
    private static final long serialVersionUID = -2894269137259898072L;
 
    public PersonNotFoundException( final String email ) {
        super(
            Response
                .status( Status.NOT_FOUND )
                .entity( "Person not found: " + email )
                .build()
        );
    }
}
The complete project is hosted on GitHub. Let's finish with boring part and move on to the sweet one: BDD. Not a surprise that specs2 has a nice support for Given/When/Then style, as described in the documentation. So using specs2, our test case becomes something like this:
"Create new person with email <a@b.com>" ^ br^
    "Given REST client for application deployed at ${http://localhost:8080}" ^ client^
    "When I do POST to ${rest/api/people}" ^ post(
        Map(
            "email" -> "a@b.com", 
            "firstName" -> "Tommy", 
            "lastName" -> "Knocker"
        )
    )^
    "Then I expect HTTP code ${201}"  ^ expectResponseCode^
    "And HTTP header ${Location} to contain ${http://localhost:8080/rest/api/people/a@b.com}" ^ expectResponseHeader^
Not bad, but what are those ^, br, client, post, expectResponseCode and expectResponseHeader? The ^, br is just some sugar specs2 brings to support Given/When/Then chain. Others, post, expectResponseCode and expectResponseHeader are just couple of functions/variables we define to do actual work. For example, client is a new JAX-RS 2.0 client, which we create like that (using Scala syntax):
val client: Given[ Client ] = ( baseUrl: String ) => 
    ClientBuilder.newClient( new ClientConfig().property( "baseUrl", baseUrl ) )    
The baseUrl is taken from Given definition itself, it's enclosed into ${...} construct. Also, we can see that Given definition has a strong type: Given[ Client ]. Later we will see that same is true for When and Then, they both do have respective strong types When[ T, V ] and Then[ V ].
The flow looks like this:
  • start from Given definition, which returns Client.
  • continue with When definition, which accepts Client from Given and returns Response
  • end up with number of Then definitions, which accept Response from When and check actual expectations
Here is how post definition looks like (which itself is When[ Client, Response ]):
def post( values: Map[ String, Any ] ): When[ Client, Response ] = ( client: Client ) => ( url: String ) =>  
    client
        .target( s"${client.getConfiguration.getProperty( "baseUrl" )}/$url" )
        .request( MediaType.APPLICATION_JSON )
        .post( 
            Entity.form( values.foldLeft( new Form() )( 
                ( form, param ) => form.param( param._1, param._2.toString ) ) 
            ),
            classOf[ Response ] 
        )
And finally expectResponseCode and expectResponseHeader, which are very similar and have the same type Then[ Response ]:
val expectResponseCode: Then[ Response ] = ( response: Response ) => ( code: String ) => 
    response.getStatus() must_== code.toInt                           

val expectResponseHeader: Then[ Response ] = ( response: Response ) => ( header: String, value: String ) =>        
    response.getHeaderString( header ) should contain( value ) 
Yet another example, checking response content against JSON payload:
"Retrieve existing person with email <a@b.com>" ^ br^
    "Given REST client for application deployed at ${http://localhost:8080}" ^ client^
    "When I do GET to ${rest/api/people/a@b.com}" ^ get^
    "Then I expect HTTP code ${200}" ^ expectResponseCode^
    "And content to contain ${JSON}" ^ expectResponseContent(
    """
        {
            "email": "a@b.com", 
            "firstName": "Tommy", 
            "lastName": "Knocker" 
        }            
    """
    )^
This time we are doing GET request using following get implementation:
val get: When[ Client, Response ] = ( client: Client ) => ( url: String ) =>  
    client
        .target( s"${client.getConfiguration.getProperty( "baseUrl" )}/$url" )
        .request( MediaType.APPLICATION_JSON )
        .get( classOf[ Response ] )
Though specs2 has rich set of matchers to perform different checks against JSON payloads, I am using spray-json, a lightweight, clean and simple JSON implementation in Scala (it's true!) and here is the expectResponseContent implementation:
def expectResponseContent( json: String ): Then[ Response ] = ( response: Response ) => ( format: String ) => {
    format match { 
        case "JSON" => response.readEntity( classOf[ String ] ).asJson must_== json.asJson
        case _ => response.readEntity( classOf[ String ] ) must_== json
    }
}            

And the last example (doing POST for existing e-mail):

"Create yet another person with same email <a@b.com>" ^ br^
    "Given REST client for application deployed at ${http://localhost:8080}" ^ client^
    "When I do POST to ${rest/api/people}" ^ post(
        Map( 
            "email" -> "a@b.com" 
        )
    )^
    "Then I expect HTTP code ${409}" ^ expectResponseCode^
    "And content to contain ${Person already exists: a@b.com}" ^ expectResponseContent^
Looks great! Nice, expressive BDD, using strong types and static compilation! For sure, JUnit integrations is available and works great with Eclipse.

Not to forget about own specs2 reports (generated by maven-specs2-plugin): mvn clean test

Please, look for complete project on GitHub. Also, please note, as I am using the latest JAX-RS 2.0 milestone (final draft), the API may change a bit when be released.

I am still learning along the way but I like it so far.