In my previous post I have covered couple of interesting use cases implementing STOMP messaging over Websockects using well-known message brokers, HornetQ and ActiveMQ. But the one I didn't cover is Apollo as in my own opinion its API is verbose and not expressive enough as for a Java developer. Nevertheless, the more time I spent playing with Apollo, more convinced I became that there is quite a potential out there. So this post is all about Apollo.
The problem we're trying to solve stays the same: simple publish/subscribe solution where JavaScript web client sends messages and listens for a specific topic. Whenever any message is received, client shows alert window (please note that we need to use modern browser which supports Websockets, such as Google Chrome or Mozilla Firefox).
Let's make our hands dirty by starting off with index.html (which imports awesome stomp.js JavaScript library):
The client part is not that different except topic name which is now /topic/test. The server side however differs a lot. Apollo is written is Scala and embraces asynchronous, non-blocking programming model. I think, it's a very good thing. What it brings though is a new paradigm to program against and it's also not necessarily a bad thing. The AppConfig class is the one which configures embedded Apollo broker:
package com.example.messaging;

import java.io.File;

import org.apache.activemq.apollo.broker.Broker;
import org.apache.activemq.apollo.broker.jmx.dto.JmxDTO;
import org.apache.activemq.apollo.dto.AcceptingConnectorDTO;
import org.apache.activemq.apollo.dto.BrokerDTO;
import org.apache.activemq.apollo.dto.TopicDTO;
import org.apache.activemq.apollo.dto.VirtualHostDTO;
import org.apache.activemq.apollo.dto.WebAdminDTO;
import org.apache.activemq.apollo.stomp.dto.StompDTO;
import org.springframework.context.annotation.Bean;
import org.springframework.context.annotation.Configuration;

@Configuration
public class AppConfig {
    @Bean
    public Broker broker() throws Exception {
        final Broker broker = new Broker();

        // Configure STOMP over WebSockects connector
        final AcceptingConnectorDTO ws = new AcceptingConnectorDTO();
        ws.id = "ws";
        ws.bind = "ws://localhost:61614";
        ws.protocols.add( new StompDTO() );

        // Create a topic with name 'test'
        final TopicDTO topic = new TopicDTO();
        topic.id = "test";

        // Create virtual host (based on localhost)
        final VirtualHostDTO host = new VirtualHostDTO();
        host.id = "localhost";
        host.topics.add( topic );
        host.host_names.add( "localhost" );
        host.host_names.add( "127.0.0.1" );
        host.auto_create_destinations = false;

        // Create a web admin UI (REST) accessible at: http://localhost:61680/api/index.html#!/
        final WebAdminDTO webadmin = new WebAdminDTO();
        webadmin.bind = "http://localhost:61680";

        // Create JMX instrumentation
        final JmxDTO jmxService = new JmxDTO();
        jmxService.enabled = true;

        // Finally, glue all together inside broker configuration
        final BrokerDTO config = new BrokerDTO();
        config.connectors.add( ws );
        config.virtual_hosts.add( host );
        config.web_admins.add( webadmin );
        config.services.add( jmxService );

        broker.setConfig( config );
        broker.setTmp( new File( System.getProperty( "java.io.tmpdir" ) ) );

        broker.start( new Runnable() {
            @Override
            public void run() {
                System.out.println("The broker has been started started.");
            }
        } );

        return broker;
    }
}
I guess it becomes clear what I meant by verbose and not expressive enough but at least it's easy to follow. Firstly, we are creating Websockects connector at ws://localhost:61614 and asking it to support the STOMP protocol. Then we are creating a simple topic with name test (which we refer as /topic/test on client side). Next important step is to create a virtual host and to bind topics (and queues if any) to it. The host names list is very important as the destination resolution logic heavily relies on it. In the following step we are configuring web admin UI and JMX instrumentation which provides us with access to configuration, statistics and monitoring. To check it out, please open this URL in your web browser once Apollo broker is started. And finally, by applying configuration and starting the broker we are good to go! As you can see, asynchronous programming model leads to callbacks and anonymous functions (where are you, Java 8?).
Now, when configuration is done, it's time to look at start-up logic placed into Starter class (again, callbacks and anonymous functions are used to perform graceful shutdown logic):
package com.example.messaging;

import java.util.concurrent.CountDownLatch;
import java.util.concurrent.TimeUnit;

import org.apache.activemq.apollo.broker.Broker;
import org.springframework.context.annotation.ConfigurableApplicationContext;

public class Starter  {
    public static void main( String[] args ) throws Exception {
        try( ConfigurableApplicationContext context = new AnnotationConfigApplicationContext( AppConfig.class ) ) {
            final Broker broker = context.getBean( Broker.class );
            System.out.println( "Press any key to terminate ..." );
            System.in.read();

            final CountDownLatch latch = new CountDownLatch( 1 );
            broker.stop( new Runnable() {
                @Override
                public void run() {
                    System.out.println("The broker has been stopped.");
                    latch.countDown();
                }
            } );

            // Gracefully stop the broker
            if( !latch.await( 1, TimeUnit.SECONDS ) ) {
                System.out.println("The broker hasn't been stopped, exiting anyway ...");
            }
        }
    }
}
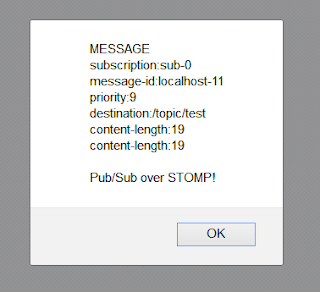
As with the previous examples, after running Starter class and opening index.html in the browser, we should see something like that:
Great, it works just fine! I am pretty sure that just rewriting the code in Scala, this Apollo API usage example will look much more compact and concise. In any case, I think Apollo message broker is definitely worth to consider if you are looking for prominent messaging architecture.
All sources are available on GitHub: Apollo example.


2 comments:
Hi Anbdriy.
I have got an Apollo broker up and running. I am new to this and struggling not only to get this broker working with messages, but understanding and interfacing to it with Python.
Your's is the firs where I actually have made significant progress past just getting the broker up and running and getting the admin working.
I'm trying to create topics and some test messages. Now the questions:
Where do I load your starter script and how do I run it so it will post a message to my broker at 127.0.0.1?
I also can't find the index.html file for the broker web server. Can you help here. I know these are pretty simple questions but it's a steep learning curve on this at first.
Hi,
Thanks a lot for your comment. Here are the answers to your questions: index.html is located here https://github.com/reta/spring-apollo-stomp-websockets/tree/master/src/main/javascript. To run the Java application, there are two steps to perform (once you clone the repo from GitHub):
- build the project mvn clean package
- run the app using either bat/shell script in target/appassembler/bin or from command line: java -cp target/appassembler/repo/* com.example.messaging.Starter
Please let me know if you need more details.
Thanks!
Best Regards,
Andriy Redko
Post a Comment