Showing posts with label sse. Show all posts

Sunday, August 26, 2018

Embracing modular Java platform: Apache CXF on Java 10

It's been mostly a year since Java 9 release finally delivered Project Jigsaw to the masses. It was a long, long journey, but it is there, so what has changed? This is a very good question and the answer to it is not obvious and straightforward.

By and large, Project Jigsaw is a disruptive change and there are many reasons why. Although mostly all of our existing application are going to run on Java 10 (to be replaced by JDK 11 very soon) with minimal or no changes, there are deep and profound implications Project Jigsaw brings to the Java developers: embrace the modular applications the Java platform way.

With the myriads of awesome frameworks and libraries out there, it will surely take time, a lot of time, to convert them to Java modules (many will not ever make it). This path is thorny but there are certain things which are already possible even today. In this rather short post we are going to learn how to use terrific Apache CXF project to build JAX-RS 2.1 Web APIs in a truly modular fashion using latest JDK 10.

Since 3.2.5 release, all Apache CXF artifacts have their manifests enriched with an Automatic-Module-Name directive. It does not make them full-fledged modules, but this is a first step in the right direction. So let us get started ...

If you use Apache Maven as the build tool of choice, not much changed here, the dependencies are declared the same way as before.

<dependencies>
    <dependency>
        <groupId>org.apache.cxf</groupId>
        <artifactId>cxf-rt-frontend-jaxrs</artifactId>
        <version>3.2.5</version>
    </dependency>

    <dependency>
        <groupId>com.fasterxml.jackson.jaxrs</groupId>
        <artifactId>jackson-jaxrs-json-provider</artifactId>
        <version>2.9.6</version>
    </dependency>

    <dependency>
        <groupId>org.eclipse.jetty</groupId>
        <artifactId>jetty-server</artifactId>
        <version>9.4.11.v20180605</version>
    </dependency>

    <dependency>
        <groupId>org.eclipse.jetty</groupId>
        <artifactId>jetty-webapp</artifactId>
        <version>9.4.11.v20180605</version>
    </dependency>
</dependencies>

The uber-jar or fat-jar packaging are not really applicable to the modular Java applications so we have to collect the modules ourselves, for example at the target/modules folder.

<plugin>
    <artifactId>maven-jar-plugin</artifactId>
    <version>3.1.0</version>
    <configuration>
        <outputDirectory>${project.build.directory}/modules</outputDirectory>
    </configuration>
</plugin>

<plugin>
    <groupId>org.apache.maven.plugins</groupId>
    <artifactId>maven-dependency-plugin</artifactId>
    <version>3.1.1</version>
    <executions>
        <execution>
            <phase>package</phase>
            <goals>
                <goal>copy-dependencies</goal>
            </goals>
            <configuration>
                <outputDirectory>${project.build.directory}/modules</outputDirectory>
                <includeScope>runtime</includeScope>
            </configuration>
        </execution>
    </executions>
</plugin>

All good, the next step is to create the module-info.java and list there the name of our module (com.example.cxf in this case) and, among other things, all required modules it needs in order to be functionable.

module com.example.cxf {
    exports com.example.rest;
    
    requires org.apache.cxf.frontend.jaxrs;
    requires org.apache.cxf.transport.http;
    requires com.fasterxml.jackson.jaxrs.json;
    
    requires transitive java.ws.rs;
    
    requires javax.servlet.api;
    requires jetty.server;
    requires jetty.servlet;
    requires jetty.util;
    
    requires java.xml.bind;
}

As you may spot right away, org.apache.cxf.frontend.jaxrs and org.apache.cxf.transport.http come from Apache CXF distribution (the complete list is available in the documentation) whereas java.ws.rs is the JAX-RS 2.1 API module. After that we could proceed with implementing our JAX-RS resources the same way we did before.

@Path("/api/people")
public class PeopleRestService {
    @GET
    @Produces(MediaType.APPLICATION_JSON)
    public Collection<Person> getAll() {
        return List.of(new Person("John", "Smith", "john.smith@somewhere.com"));
    }
}

This looks easy, how about adding some spicy sauce, like server-sent events (SSE) and RxJava, for example? Let us see how exceptionally easy it is, starting from dependencies.

<dependency>
    <groupId>org.apache.cxf</groupId>
    <artifactId>cxf-rt-rs-sse</artifactId>
    <version>3.2.5</version>
</dependency>

<dependency>
    <groupId>io.reactivex.rxjava2</groupId>
    <artifactId>rxjava</artifactId>
    <version>2.1.14</version>
</dependency>

Also, we should not forget to update our module-info.java by adding the requires directive to these new modules.

module com.example.cxf {
    ...
    requires org.apache.cxf.rs.sse;
    requires io.reactivex.rxjava2;
    requires transitive org.reactivestreams;
    ...

}

In order to keep things simple, our SSE endpoint would just broadcast every new person added through the API. Here is the implementation snippet which does it.

private SseBroadcaster broadcaster;
private Builder builder;
private PublishSubject<Person> publisher;
    
public PeopleRestService() {
    publisher = PublishSubject.create();
}

@Context 
public void setSse(Sse sse) {
    this.broadcaster = sse.newBroadcaster();
    this.builder = sse.newEventBuilder();
        
    publisher
        .subscribeOn(Schedulers.single())
        .map(person -> createEvent(builder, person))
        .subscribe(broadcaster::broadcast);
}

@POST
@Produces(MediaType.APPLICATION_JSON)
@Consumes(MediaType.APPLICATION_JSON)
public Response add(@Context UriInfo uriInfo, Person payload) {
    publisher.onNext(payload);
        
    return Response
        .created(
            uriInfo
                .getRequestUriBuilder()
                .path(payload.getEmail())
                .build())
        .entity(payload)
        .build();
}
    
@GET
@Path("/sse")
@Produces(MediaType.SERVER_SENT_EVENTS)
public void people(@Context SseEventSink sink) {
    broadcaster.register(sink);
}

Now when we build it:

      mvn clean package

And run it using module path:

      java --add-modules java.xml.bind \
           --module-path target/modules \
           --module com.example.cxf/com.example.Starter

We should be able to give our JAX-RS API a test drive. The simplest way to make sure things work as expected is to navigate in the Google Chrome to the SSE endpoint http://localhost:8686/api/people/sse and add some random people through the POST requests, using the old buddy curl from the command line:

      curl -X POST http://localhost:8686/api/people \
           -d '{"email": "john@smith.com", "firstName": "John", "lastName": "Smith"}' \
           -H "Content-Type: application/json"
      curl -X POST http://localhost:8686/api/people \
           -d '{"email": "tom@tommyknocker.com", "firstName": "Tom", "lastName": "Tommyknocker"}' \
           -H "Content-Type: application/json"

In the Google Chrome we should be able to see raw SSE events, pushed by the server (they are not looking pretty but good enough to illustrate the flow).

So, what about the application packaging? Docker and containers are certainly a viable option, but with Java 9 and above we have another player: jlink. It assembles and optimizes a set of modules and their dependencies into a custom, fully sufficient runtime image. Let us try it out.

      jlink --add-modules java.xml.bind,java.management \
            --module-path target/modules \
            --verbose \
            --strip-debug \
            --compress 2 \
            --no-header-files \
            --no-man-pages \
            --output target/cxf-java-10-app

Here we are hitting the first wall. Unfortunately, since mostly all the dependencies of our application are automatic modules, it is a problem for jlink and we still have to include module path explicitly when running from the runtime image:

      target/cxf-java-10-app/bin/java  \
           --add-modules java.xml.bind \
           --module-path target/modules \
           --module com.example.cxf/com.example.Starter

At the end of the day it turned out to be not that scary. We are surely in the very early stage of the JPMS adoption, this is just a beginning. When every library, every framework we are using adds the module-info.java to their artifacts (JARs), making them true modules despite all the quirks, then we could declare a victory. But the small wins are already happening, make one yours!

The complete source of the project is available on Github.

Monday, October 30, 2017

Better late than never: SSE, or Server-Sent Events, are now in JAX-RS

Server-Sent Events (or just SSE) is quite useful protocol which allows the servers to push data to the clients over HTTP. This is something our web browsers support for ages but, surprisingly, neglected by JAX-RS specification for quite a long time. Although Jersey had an extension available for SSE media type, the API has never been formalized and as such, was not portable to other JAX-RS implementations.

Luckily, JAX-RS 2.1, also known as JSR-370, has changed that by making SSE support, both client-side and server-side, a part of the official specification. In today's post we are going to look at how to integrate SSE support into the existing Java REST(ful) web services, using recently released version 3.2.0 of the terrific Apache CXF framework. In fact, beside the bootstrapping, there is nothing CXF-specific really, all the examples should work in any other framework which implements JAX-RS 2.1 specification.

Without further ado, let us get started. As the significant amount of Java projects these days are built on top of awesome Spring Framework, our sample application would use Spring Boot and Apache CXF Spring Boot Integration to get us off the ground quickly. The old good buddy Apache Maven would help us as well by managing our project dependencies.


    org.springframework.boot
    spring-boot-starter
    1.5.8.RELEASE


    org.apache.cxf
    cxf-rt-frontend-jaxrs
    3.2.0


    org.apache.cxf
    cxf-spring-boot-starter-jaxrs
    3.2.0


    org.apache.cxf
    cxf-rt-rs-client
    3.2.0


     org.apache.cxf
     cxf-rt-rs-sse
     3.2.0

Under the hood Apache CXF is using Atmosphere framework to implement SSE transport so this is another dependency we have to include.


    org.atmosphere
    atmosphere-runtime
    2.4.14

The specifics around relying on Atmosphere framework introduces a need to provide additional configuration settings, namely transportId, so to ensure that SSE-capable transport will be picked up at runtime. The relevant details could be added into application.yml file:

cxf:
  servlet:
    init:
      transportId: http://cxf.apache.org/transports/http/sse

Great, so the foundation is there, moving on. The REST(ful) web service we are going to build would expose imaginary CPU load averages (for simplicity randomly generated) as the SSE streams. The Stats class would constitute our data model.

public class Stats {
    private long timestamp;
    private int load;

    public Stats() {
    }

    public Stats(long timestamp, int load) {
        this.timestamp = timestamp;
        this.load = load;
    }

    // Getters and setters are omitted
    ...
}

Speaking of streams, the Reactive Streams specification made its way into Java 9 and hopefully we are going to see the accelerated adoption of the reactive programming models by Java community. Moreover, developing SSE-enabled REST(ful) web services would be so much easier and straightforward when backed by Reactive Streams. To make the case, let us onboard RxJava 2 into our sample application.


    io.reactivex.rxjava2
    rxjava
    2.1.6

This is a good moment to start with our StatsRestService class, the typical JAX-RS resource implementation. The key SSE capabilities in JAX-RS 2.1 are centered around Sse contextual object which could be inject like this.

@Service
@Path("/api/stats")
public class StatsRestService {
    @Context 
    public void setSse(Sse sse) {
        // Access Sse context here
    }

Out of the Sse context we could get access to two very useful abstractions: SseBroadcaster and OutboundSseEvent.Builder, for example:

private SseBroadcaster broadcaster;
private Builder builder;
    
@Context 
public void setSse(Sse sse) {
    this.broadcaster = sse.newBroadcaster();
    this.builder = sse.newEventBuilder();
}

As you may already guess, the OutboundSseEvent.Builder constructs the instances of the OutboundSseEvent classes which could be sent over the wire, while SseBroadcaster broadcasts the same SSE stream to all the connected clients. With that being said, we could generate the stream of OutboundSseEvents and distribute it to everyone who is interested:

private static void subscribe(final SseBroadcaster broadcaster, final Builder builder) {
    Flowable
        .interval(1, TimeUnit.SECONDS)
        .zipWith(eventsStream(builder), (id, bldr) -> createSseEvent(bldr, id))
        .subscribeOn(Schedulers.single())
        .subscribe(broadcaster::broadcast);
}

private static Flowable<OutboundSseEvent.Builder> eventsStream(final Builder builder) {
    return Flowable.generate(emitter -> emitter.onNext(builder.name("stats")));
}

If you are not familiar with RxJava 2, no worries, this is what is happening here. The eventsStream method returns an effectively infinite stream of OutboundSseEvent.Builder instances for the SSE events of type stats. The subscribe method is a little bit more complicated. We start off by creating a stream which emits sequential number every second, f.e. 0,1,2,3,4,5,6,... and so on. Later, we combine this stream with the one returned by eventsStream method, essentially merging both streams to a single one which emits a tuple of (number, OutboundSseEvent.Builder) every second. Fairly speaking, this tuple is not very useful to us so we transform it to the instance of OutboundSseEvent class, treating the number as SSE event identifier:

private static final Random RANDOM = new Random();

private static OutboundSseEvent createSseEvent(OutboundSseEvent.Builder builder, long id) {
    return builder
        .id(Long.toString(id))
        .data(Stats.class, new Stats(new Date().getTime(), RANDOM.nextInt(100)))
        .mediaType(MediaType.APPLICATION_JSON_TYPE)
        .build();
}

The OutboundSseEvent may carry any payload in the data property which will be serialized with respect to the mediaType specified, using the usual MessageBodyWriter resolution strategy. Once we get our OutboundSseEvent instance, we send it off using SseBroadcaster::broadcast method. Please notice that we handed off the control flow to another thread using subscribeOn operator, this is usually what you would do all the time.

Good, hopefully the stream part is cleared out now but how could we actually subscribe to the SSE events emitted by SseBroadcaster? That is easier than you might think:

@GET
@Path("broadcast")
@Produces(MediaType.SERVER_SENT_EVENTS)
public void broadcast(@Context SseEventSink sink) {
    broadcaster.register(sink);
}

And we are all set. The most important piece here is content type being produced, which should be set to MediaType.SERVER_SENT_EVENTS. In this case, the contextual instance of the SseEventSink becomes available and could be registered with SseBroadcaster instance.

To see our JAX-RS resource in action, we need to bootstrap the server instance using, for example, JAXRSServerFactoryBean, configuring all the necessary providers along the way. Please take a note that we are also explicitly specifying transport to be used, in this case SseHttpTransportFactory.TRANSPORT_ID.

@Configuration
@EnableWebMvc
public class AppConfig extends WebMvcConfigurerAdapter {
    @Bean
    public Server rsServer(Bus bus, StatsRestService service) {
        JAXRSServerFactoryBean endpoint = new JAXRSServerFactoryBean();
        endpoint.setBus(bus);
        endpoint.setAddress("/");
        endpoint.setServiceBean(service);
        endpoint.setTransportId(SseHttpTransportFactory.TRANSPORT_ID);
        endpoint.setProvider(new JacksonJsonProvider());
        return endpoint.create();
    }
    
    @Override
    public void addResourceHandlers(ResourceHandlerRegistry registry) {
        registry
          .addResourceHandler("/static/**")
          .addResourceLocations("classpath:/web-ui/"); 
    }
}

To close the loop, we just need to supply the runner for our Spring Boot application:

@SpringBootApplication
public class SseServerStarter {    
    public static void main(String[] args) {
        SpringApplication.run(SseServerStarter.class, args);
    }
}

Now, if we run the application and navigate to http://localhost:8080/static/broadcast.html using multiple web browsers or different tabs within the same browser, we would observe the identical stream of events charted inside all of them:

Nice, broadcasting is certainly a valid use case, but what about returning an independent SSE stream on each endpoint invocation? Easy, just use SseEventSink methods, like send and close, to manipulate the SSE stream directly.

@GET
@Path("sse")
@Produces(MediaType.SERVER_SENT_EVENTS)
public void stats(@Context SseEventSink sink) {
    Flowable
        .interval(1, TimeUnit.SECONDS)
        .zipWith(eventsStream(builder), (id, bldr) -> createSseEvent(bldr, id))
        .subscribeOn(Schedulers.single())
        .subscribe(sink::send, ex -> {}, sink::close);
}

This time, if we run the application and navigate to http://localhost:8080/static/index.html using multiple web browsers or different tabs within the same browser, we would observe absolutely different charts:

Excellent, the server-side APIs are indeed very concise and easy to use. But what about client side, could we consume SSE streams from the Java applications? The answer is yes, absolutely. The JAX-RS 2.1 outlines the client-side API as well, with SseEventSource in the heart of it.


final WebTarget target = ClientBuilder
    .newClient()
    .register(JacksonJsonProvider.class)
    .target("http://localhost:8080/services/api/stats/sse");
        
try (final SseEventSource eventSource =
            SseEventSource
                .target(target)
                .reconnectingEvery(5, TimeUnit.SECONDS)
                .build()) {

    eventSource.register(event -> {
        final Stats stats = event.readData(Stats.class, MediaType.APPLICATION_JSON_TYPE);
        System.out.println("name: " + event.getName());
        System.out.println("id: " + event.getId());
        System.out.println("comment: " + event.getComment());
        System.out.println("data: " + stats.getLoad() + ", " + stats.getTimestamp());
        System.out.println("---------------");
    });
    eventSource.open();

    // Just consume SSE events for 10 seconds
    Thread.sleep(10000); 
}     

If we run this code snippet (assuming the server is up and running as well) we would see something like that in the console (as you may recall, the data is generated randomly).

name: stats
id: 0
comment: null
data: 82, 1509376080027
---------------
name: stats
id: 1
comment: null
data: 68, 1509376081033
---------------
name: stats
id: 2
comment: null
data: 12, 1509376082028
---------------
name: stats
id: 3
comment: null
data: 5, 1509376083028
---------------

...

As we can see, the OutboundSseEvent from server-side becomes InboundSseEvent for the client side. The client may consume any payload from the data property which could be deserialized by specifying expected media type, using the usual MessageBodyReader resolution strategy.

There are a lot of material squeezed in the single post. And still, there are few more things regarding SSE and JAX-RS 2.1 which we have not covered here, like for example using HttpHeaders.LAST_EVENT_ID_HEADER or configuring reconnect delays. Those could be a great topic for the upcoming post if there would be an interest to learn about.

To conclude, the SSE support in JAX-RS is what many of us have been awaiting for so long. Finally, it is the there, please give it a try!

The complete project sources are available on Github.

Saturday, August 31, 2013

Lightweight real-time charts with Play Framework and Scala using server-side events

Continuing a great journey with awesome Play Framework and Scala language, I would like to share yet another interesting implementation of real-time charting: this time by using lightweight server-side events instead of full-duplex WebSockets technology described previously in this post. Indeed, if you don't need a bidirectional communication but only server push, server-side events look as a very natural fit. And if you are using Play Framework, it's really easy to do as well.

Let's try to cover the same use case so it will be fair to compare both implementations: we have couple of hosts and we would like to watch CPU usage on each one in real-time (on a chart). Let's start by creating a simple Play Framework application (choosing Scala as a primary language):

play new play-sse-example

Now, when the layout of our application is ready, our next step is to create some starting web page (using Play Framework's type safe template engine) and name it as views/dashboard.scala.html. Here is how it looks like:

@(title: String, hosts: List[Host])

<!DOCTYPE html>
<html>
  <head>
    <title>@title</title>
    <link rel="stylesheet" media="screen" href="@routes.Assets.at("stylesheets/main.css")">
    <link rel="shortcut icon" type="image/png" href="@routes.Assets.at("images/favicon.png")">
    <script src="@routes.Assets.at("javascripts/jquery-1.9.0.min.js")" type="text/javascript"></script>
    <script src="@routes.Assets.at("javascripts/highcharts.js")" type="text/javascript"></script>
  </head>
    
  <body>
    <div id="hosts">
      <ul class="hosts">
        @hosts.map { host =>
          <li>               
            <a href="#" onclick="javascript:show( '@host.id' )">@host.name</a>
          </li>
        }
      </ul>
    </div>    
    <div id="content">
    </div>
  </body>
</html>

<script type="text/javascript">
function show( hostid ) {
  $('#content').trigger('unload');
 
  $("#content").load( "/host/" + hostid,
    function( response, status, xhr ) {
      if (status == "error") {   
        $("#content").html( "Sorry but there was an error:" + xhr.status + " " + xhr.statusText);
      }
    }
  )
}
</script>

The template looks exactly the same as in WebSockets example, except one single line, the purpose of this one will be explained just a bit later.

$('#content').trigger('unload');

The result of this web page is a simple list of hosts. Whenever user clicks on a host link, the host-specific view will be fetched from the server (using AJAX) and displayed. Next template is the most interesting one, views/host.scala.html, and contains a lot of important details:

@(host: Host)( implicit request: RequestHeader )

<div id="content">
  <div id="chart"></div>
 
  <script type="text/javascript">
    var charts = []   
      charts[ '@host.id' ] = new Highcharts.Chart({                 
        chart: {
          renderTo: 'chart',
          defaultSeriesType: 'spline'            
        },           
        xAxis: {
          type: 'datetime'
        },   
        series: [{
          name: "CPU",
          data: []
        }
      ]
    }); 
  </script>     
</div>

<script type="text/javascript">
  if( !!window.EventSource ) {
    var event = new EventSource("@routes.Application.stats( host.id )");
 
    event.addEventListener('message', function( event ) { 
      var datapoint = jQuery.parseJSON( event.data );
      var chart = charts[ '@host.id' ];
       
      chart.series[ 0 ].addPoint({
        x: datapoint.cpu.timestamp,
        y: datapoint.cpu.load
      }, true, chart.series[ 0 ].data.length >= 50 );
    } );

    $('#content').bind('unload',function() {
      event.close();
    });                         
  }  
</script>

The core UI component is a simple chart, built using Highcharts library. The script block at the bottom tries to create an EventSource object which is an implementation of server-side events on browser side. If browser supports server-side events, the respective connection to server-side endpoint will be created and chart will be updated on every message received from the server ('message' listener). It's a good time to explain the purpose of this construct (and it's counterpart $('#content').trigger('unload') mentioned above):

$('#content').bind('unload',function() {
  event.close();
});

Whenever user clicks on different hosts, the previous event stream should be closed and new one should be created. Not doing so leads to more and more event streams to be created, flooding browser with more and more event listeners. To overcome this, we bind an unload method to a div element with id content and call it all the time when user clicks on a host. By doing that, we close event stream all the time before opening a new one. Enough UI, let's move on to back-end.

The routing table and mostly all the code stay the same, except only two small method changes, Statistics.attach and Application.stats. Let's take a look how server push of host's CPU statistics using server-side events is implemented on controller side (and mapped to /stats/:id URL):

def stats( id: String ) = Action { request =>
  Hosts.hosts.find( _.id == id ) match {
    case Some( host ) =>
      Async { 
        Statistics.attach( host ).map { enumerator =>      
          Ok.stream( enumerator &> EventSource() ).as( "text/event-stream")
        }
      }
    case None => NoContent  
  }
}

Very short piece of code which does a lot of things. After finding the respective host by its id, we "attaching" to it by receiving the Enumerator instance: the continuous flow of CPU statistics data. The Ok.stream( enumerator &> EventSource() ).as( "text/event-stream") will transform this continuous flow of statistics data to stream of events which client is able to consume using server-side events.

To finish with server-side changes, let's take a look how "attaching" to host's statistics flow looks like:

def attach( host: Host ): Future[ Enumerator[ JsValue ] ] = {
  ( actor( host.id ) ? Connect( host ) ).map {      
    case Connected( enumerator ) => enumerator
  }
}

It's as simple as returning the Enumerator, and because we are using Akka actors, it becomes a bit more tricky with Future and asynchronous invocations. And, that's it!

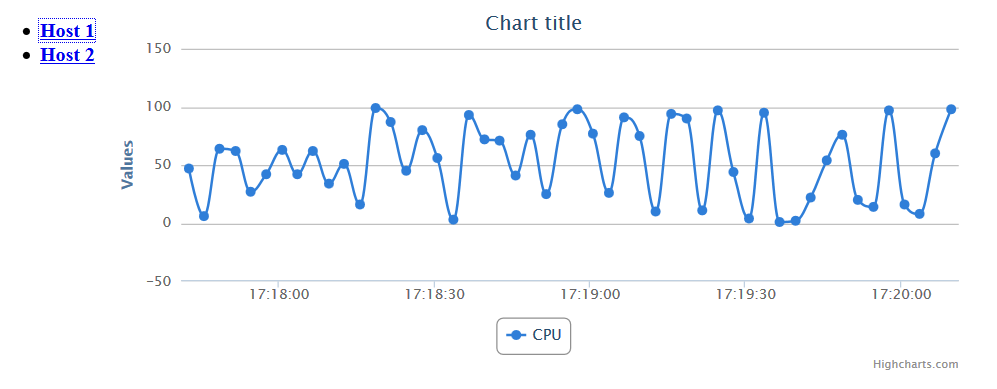
In action our simple application looks like this (using Mozilla Firefox), having only Host 1 and Host 2 as an example:

Very nice and simple, and yet again, thanks a lot to Play Framework guys and the community. Complete source code is available on GitHub.