Showing posts with label GroovyWS. Show all posts

Saturday, October 29, 2011

Back to soapUI: testing web services and Java RMI services

I already covered soapUI in one of my previous blog posts. As I still use this tool quite often and extremely excited about it, I would like to share more testing scenarios we as a developers can use on day-by-day basis. The ones for today's post would be: testing web services and Java RMI services.

So first thing first: let's assume we are developing application which exposes web services and our goal is to have some integration testing in place. We don't want to hard-code SOAP requests and responses, we want to leverage Groovy to code real test cases. Thanks to soapUI, it's so easy to do by using Groovy test steps. Let me omit the routine and focus on bare bones details. I created a simple test project in soapUI with this structure:

The interesting part is here: Call web service Groovy step. Before we move on, let's copy several JAR files to <soapUI home>\bin\ext folder: Then we need to restart soapUI. Now we are ready to fill in the Groovy step with some code. Thanks to GroovyWS, calling web service from Groovy is very easy:

import groovyx.net.ws.WSClient

def properties = testRunner.testCase.getTestStepByName( "Properties" )
def service = new WSClient( properties.getPropertyValue( "url" ), this.class.classLoader )
service.initialize()

def token = service.login(
 properties.getPropertyValue( "username" ),
 properties.getPropertyValue( "password" )
)

assert token != null, "Login is not successful"
Properties step just contains username, password and url configuration:
And that's it! Now we can call additional web service methods and easily run this test case as load test: just to verify how web service behaves under heavy load. I usually do it overnight to see application heap, GC and whatnot. Cool.

Second use case: testing Java RMI services. This one requires a bit more work to be done. First of all, you need soapUI to be run using RMISecurityManager. Let's do this.

  1. Create file soapui.policy with content below and store it in <soapUI home>\bin:
    grant {
        permission java.security.AllPermission;
    };
    
  2. Change soapUI command line (<soapUI home>\bin\soapui.bat). Find the line set JAVA_OPTS=... and append to it:
    -Djava.security.policy=soapui.policy -Djava.security.manager=java.rmi.RMISecurityManager
    
    So you will have something like this: set JAVA_OPTS=-Xms128m -Xmx1024m -Dsoapui.properties=soapui.properties "-Dsoapui.home=%SOAPUI_HOME%\" -Djava.security.policy=soapui.policy -Djava.security.manager=java.rmi.RMISecurityManager
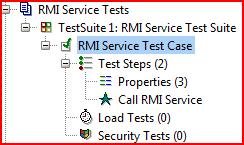
To run a bit ahead, we need to copy several JAR files to <soapUI home>\bin\ext folder: Now we a good and just need to restart soapUI. The sample project structure is very similar to what we did before:

Respective Groovy test step is built using Spring Framework which significantly simplifies creating RMI stubs and clients by getting rid of the boilerplate code.
import org.springframework.remoting.rmi.RmiProxyFactoryBean
import com.example.RmiServiceInterface

def properties = testRunner.testCase.getTestStepByName( "Properties" )
def invoker = new RmiProxyFactoryBean( 
 serviceUrl: properties.getPropertyValue( "url" ), 
 serviceInterface: com.example.RmiServiceInterface 
)
invoker.afterPropertiesSet()

def service = invoker.object
def token = service.login(
 properties.getPropertyValue( "username" ),
 properties.getPropertyValue( "password" )
)

assert token != null, "Login is not successful"
Now our service is ready for more serious testing. As with web services scenario Properties step just contains username, password and url (RMI) configuration:
I personally found soapUI to be very helpful tool in my developer toolbox and I definitely recommend using it.

Saturday, October 4, 2008

Integration testing: building our own test sandbox (practice)

Previous post prepared some theoretical background for building our own test sandbox. In this post we'll flesh out the theory with practice. So, let's follow startup steps and confirm each one with code snippets.

1. Configure HSQLDB data source and JNDI

import org.enhydra.jdbc.standard.StandardDataSource;
...

StandardDataSource
dataSource = new StandardDataSource();
dataSource.setDriverName( "org.hsqldb.jdbcDriver" );
dataSource.setUrl( "jdbc:hsqldb:mem:testdb" );
dataSource.setUser( "sa" );

In the snippet above I've used very useful XAPool project (to manipulate with JDBC data sources).

import javax.naming.Context;
import javax.naming.InitialContext;
import org.mortbay.jetty.plus.naming.NamingEntry;
import org.mortbay.jetty.plus.naming.Resource;
...

Context context = new InitialContext();
Context compCtx = ( Context )context.lookup( "java:comp" );
compCtx.createSubcontext( "env" );

// Configure JNDI
NamingEntry.setScope( NamingEntry.SCOPE_GLOBAL) ;

// This actually registers the resource in JNDI
new Resource( "jdbc/testdb", dataSource ).bindToENC();

2. Configure Hibernate

In fact, there is a trick here. I'm using AspectJ to intercept in run-time (weaver) all calls to Hibernate's class method Configuration.configure(). There is an aspect's code.

import org.aspectj.lang.ProceedingJoinPoint;
import org.aspectj.lang.annotation.Around;
import org.aspectj.lang.annotation.Aspect;
import org.hibernate.cfg.Configuration;
@Aspect
public class HibernateAspect {
@Around("execution( * org.hibernate.cfg.Configuration.configure() throws * )")
public Object reconfigure( ProceedingJoinPoint joinPoint ) throws Throwable {
Object r = ((Configuration) joinPoint.getThis()).configure( <path to configuration file> );
return r;
}
}

3. Configure Web Services for Jetty

import org.mortbay.jetty.Server;
import org.mortbay.jetty.servlet.ServletHolder;
import org.apache.axis2.transport.http.AxisServlet;
import org.mortbay.jetty.servlet.Context;
...

Server server = new Server(0);

ServletHolder
axisServletholder = new ServletHolder( new AxisServlet() );
axisServletholder.setInitParameter( "axis2.xml.path", <path to axis2.xml> );
axisServletholder.setInitParameter( "axis2.repository.path", <path to WEB-INF folder> );

Context root = new Context( server, "/", Context.SESSIONS );
root.addServlet( axisServletholder, "/servlet/AxisServlet" );
root.addServlet( axisServletholder, "/services/*" );

4. Run Jetty

server.start();
int actualPort = server.getConnectors()[0].getLocalPort();

5. Export database schema (Hibernate)

import org.hibernate.tool.hbm2ddl.SchemaExport;
...

// Be sure, Hibernate uses JNDI data source name. In this test "jdbc/testdb".
//
And database dialect is set to org.hibernate.dialect.HSQLDialect.
SchemaExport schemaExport = new SchemaExport( );
schemaExport.create( true, true );

6. Prepare test dataset (DbUnit)

import org.dbunit.database.IDatabaseConnection;
import org.dbunit.database.DatabaseConnection;
import org.dbunit.dataset.xml.FlatXmlDataSet;
import org.dbunit.dataset.IDataSet;
import org.dbunit.operation.DatabaseOperation;
import org.hibernate.Session;
import java.io.FileInputStream;
...

Session session = HibernateUtil.getCurrentSession();
IDataSet dataSet = new FlatXmlDataSet(new FileInputStream(<path to test dataset XML>));
IDatabaseConnection connection = new DatabaseConnection( session.connection() );
DatabaseOperation.CLEAN_INSERT.execute( connection, dataSet );

7. Run test(s) (Java or Groovy)

Let's summarize what we have at this point:
- Jetty is up and running
- Web Services are configured and deployed at: http://localhost:<actual port>/services/*
- Database schema is created and populated with test dataset

So we're ready to pull our web service methods. But for this purpose we need web service client. The first approach is to use raw SOAP requests. Second one is to generate web service (WSDL) stubs (Java). And last but not least is to use some scripting/dynamic language (like Groovy).

My choive was Groovy because:
- it's easy to consume web services with GroovyWS library
- it's easy to write test code
- it's excellent dynamic scripting language with seamless
Java integration

Here is code sample:

import groovyx.net.ws.WSClient;

def proxy = new WSClient(
"http://localhost:<actual port>/services/TestService?wsdl", this.class.classLoader
);

def param = proxy.create( "testServiceNamespace.SomeType" )
param.someProperty =

def result = proxy.someTestMethod( param )
assert ( result = )

Looks really great and very promising. The only problem I've encountered that GroovyWS is started recently and is "green". Unfortunately, I've failed to test most web service methods with complex in/out parameters and return types (so I was reluctant to use WSDL generated stubs).

That's it. Our test sandbox is ready for use!