Tuesday, December 13, 2011

Testing highly concurrent code

How often are you facing the issues with testing highly concurrent code? It's not so easy to write a test which verifies asynchronous procedure call or verifies that some tasks has been executed by some thread pool worker. Fortunately, it's getting much easier with this awesome library - Awaitility.

Let me demonstrate on a few simple but meaningful enough examples how easy it is to enrich your tests with it. Let's start with a POM file including only necessary stuff - JUnit and Awaitility.

 4.0.0

 com.example
 awaitility
 0.0.1-SNAPSHOT
 jar

 
  UTF-8


   com.jayway.awaitility
   awaitility
   1.3.3
   test


   junit
   junit
   4.8.2
   test


Nothing special here. Our class under the test will collect notifications for particular users. As creating the notifications could take some time, the implementation will collect those using thread pool and asynchronous method invocation pattern: the method will return immediately delegating execution to thread pool. Pretty typical design decision. Let take a look on sample implementation.
package com.example.awaitility;

import java.util.Collection;
import java.util.concurrent.ConcurrentLinkedQueue;
import java.util.concurrent.ExecutorService;
import java.util.concurrent.Executors;

public class AsyncQueueService {
    private final ExecutorService executor = Executors.newFixedThreadPool( 3 );
    private final ConcurrentLinkedQueue< Notification > queue = new ConcurrentLinkedQueue< Notification >();

    public static class Notification {
        private final long userId;

        public Notification( final long userId ) {
            this.userId = userId;
        }

        public long getUserId() {
            return userId;
        }
    }

    public void enqueue( final Collection< Long > users ) {
        executor.execute( new Runnable() {
                public void run() {
                    for( final long userId: users ) {
                        // do some work with notifications
                        queue.add( new Notification( userId ) );
                    }
                }
            }
        );
    }

    public void clear() {
        queue.clear();
    }

    public int size() {
        return queue.size();
    }
}
I omit a bunch of details trying to make code simple and concentrate on important: method enqueue. As we can see, this method delegates all the work to internal thread pool. Now, how would we create a test to verify that this method actually works? It's difficult because method returns immediately, the result of its execution will be available sometime in the future. Mocking thread pool (executor service) is not a very good idea as it uses the internals of implementation. What if we decide to move from thread pool to scheduled task? Test should work without any change. It's where Awaitility comes on a rescue. Let's take a look on this test case:
package com.example.awaitility;

import static com.jayway.awaitility.Awaitility.await;
import static org.hamcrest.core.IsEqual.equalTo;

import java.util.Arrays;
import java.util.concurrent.Callable;

import org.junit.Before;
import org.junit.Test;

public class AsyncQueueServiceTestCase {
    private AsyncQueueService service;

    @Before
    public void setUp() {
        service = new AsyncQueueService();
    }

    @Test
    public void testEnqueueManyNotifications() throws Exception {
        final Long[] users = new Long[] { 1L, 2L, 3L, 4L, 5L };

        service.enqueue( Arrays.asList( users ) );

        await().until(
            new Callable< Integer >() {
                public Integer call() throws Exception {
                    return service.size();
                }
            },
            equalTo( users.length )
        );
    }
}
As we see, the test method calls enqueue with some list of users. The test verifies that same amount of notifications should be in queue as users passed to enqueue method. With Awaitility such assertion is very trivial: just wait till service.size() will be equal to users.length!

I have just touched the surface of Awaitility. It has many features and even specific DSLs for Groovy and Scala. I highly encourage to take a look on it!

Saturday, October 29, 2011

Back to soapUI: testing web services and Java RMI services

I already covered soapUI in one of my previous blog posts. As I still use this tool quite often and extremely excited about it, I would like to share more testing scenarios we as a developers can use on day-by-day basis. The ones for today's post would be: testing web services and Java RMI services.

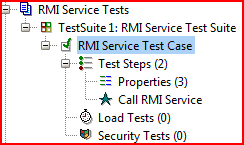
So first thing first: let's assume we are developing application which exposes web services and our goal is to have some integration testing in place. We don't want to hard-code SOAP requests and responses, we want to leverage Groovy to code real test cases. Thanks to soapUI, it's so easy to do by using Groovy test steps. Let me omit the routine and focus on bare bones details. I created a simple test project in soapUI with this structure:

The interesting part is here: Call web service Groovy step. Before we move on, let's copy several JAR files to <soapUI home>\bin\ext folder: Then we need to restart soapUI. Now we are ready to fill in the Groovy step with some code. Thanks to GroovyWS, calling web service from Groovy is very easy:

import groovyx.net.ws.WSClient

def properties = testRunner.testCase.getTestStepByName( "Properties" )
def service = new WSClient( properties.getPropertyValue( "url" ), this.class.classLoader )
service.initialize()

def token = service.login(
 properties.getPropertyValue( "username" ),
 properties.getPropertyValue( "password" )
)

assert token != null, "Login is not successful"
Properties step just contains username, password and url configuration:
And that's it! Now we can call additional web service methods and easily run this test case as load test: just to verify how web service behaves under heavy load. I usually do it overnight to see application heap, GC and whatnot. Cool.

Second use case: testing Java RMI services. This one requires a bit more work to be done. First of all, you need soapUI to be run using RMISecurityManager. Let's do this.

  1. Create file soapui.policy with content below and store it in <soapUI home>\bin:
    grant {
        permission java.security.AllPermission;
    };
    
  2. Change soapUI command line (<soapUI home>\bin\soapui.bat). Find the line set JAVA_OPTS=... and append to it:
    -Djava.security.policy=soapui.policy -Djava.security.manager=java.rmi.RMISecurityManager
    
    So you will have something like this: set JAVA_OPTS=-Xms128m -Xmx1024m -Dsoapui.properties=soapui.properties "-Dsoapui.home=%SOAPUI_HOME%\" -Djava.security.policy=soapui.policy -Djava.security.manager=java.rmi.RMISecurityManager
To run a bit ahead, we need to copy several JAR files to <soapUI home>\bin\ext folder: Now we a good and just need to restart soapUI. The sample project structure is very similar to what we did before:

Respective Groovy test step is built using Spring Framework which significantly simplifies creating RMI stubs and clients by getting rid of the boilerplate code.
import org.springframework.remoting.rmi.RmiProxyFactoryBean
import com.example.RmiServiceInterface

def properties = testRunner.testCase.getTestStepByName( "Properties" )
def invoker = new RmiProxyFactoryBean( 
 serviceUrl: properties.getPropertyValue( "url" ), 
 serviceInterface: com.example.RmiServiceInterface 
)
invoker.afterPropertiesSet()

def service = invoker.object
def token = service.login(
 properties.getPropertyValue( "username" ),
 properties.getPropertyValue( "password" )
)

assert token != null, "Login is not successful"
Now our service is ready for more serious testing. As with web services scenario Properties step just contains username, password and url (RMI) configuration:
I personally found soapUI to be very helpful tool in my developer toolbox and I definitely recommend using it.

Thursday, September 29, 2011

Different flavors of mocking with Groovy

If you don't use Groovy in your Java projects, you definitely should consider to start using it. There are many areas where Groovy would be very useful, but one I would like to talk a bit today is testing with mocking. There are a bunch of awesome frameworks to do mocking with Java (Mockito, powermock, EasyMock, ...) but Groovy allows you to do it out of the box, using built-in classes and language constructs.

Let's assume we have third-party service implementation to mock. If service was designed well, it implements some kind of interface (or interfaces) so clients could call different methods using interface contracts.
package com.example;

import java.util.Collection;

public interface SimpleService {
	Collection< String > getServiceProviders();
	Collection< String > getServiceProviders( final String regex );
}
The simplest and beautiful test case will look like this:
package com.example

import org.junit.Test

class SimpleServiceTestCase extends GroovyTestCase {
	@Test
	void testGetServiceProvidersByPattern() {
		// Create implementation from a map, method name : implementation (closure)
		def simpleService = [
			getServiceProviders : { String regex -> [ "Provider 1", "Provider 2" ] }  
		] as SimpleService
	
		assertEquals( [ "Provider 1", "Provider 2" ], 
			simpleService.getServiceProviders( "Provider*" ) )
	}
}
Awesome and easy! Let's consider another use case: service has implementation only, no interfaces. Could we mock and it as well? Yes!
package com.example;

public class SimpleServiceImpl {
	public Collection< String > getServiceProviders() {
		return null;
	}

	public Collection< String > getServiceProviders( final String regex ) {
		return null;
	}
}
The test case is a bit more verbose because of using Groovy mocking framework. You can also specify how many calls you expect as well as call sequences.
package com.example

import groovy.mock.interceptor.MockFor

import org.junit.Test

import com.example.impl.SimpleServiceImpl

class SimpleServiceTestCase extends GroovyTestCase {
	@Test
	void testGetServiceProviders() {
		def context = new MockFor( SimpleServiceImpl )
		
		context.demand.with {
			getServiceProviders() { -> [ "Provider 1", "Provider 2" ] }
		}
	
		context.use {
			def simpleService = new SimpleServiceImpl()
			
			assertEquals( [ "Provider 1", "Provider 2" ],
				simpleService.getServiceProviders() )
		}
	}
}
Cool and easy! The obvious question is, what about mocking static methods? You will love Groovy after that (as I do). Let's complicate our service a bit with static method.
package com.example;

public class SimpleServiceImpl {
	public static Collection< String > getDefaultServiceProviders() {
		return null;
	}
    
	// Other methods here
}
So the test case for mocking this static method is no more than one line of code (thanks to Groovy meta-programming capabilities):
package com.example

class SimpleServiceTestCase extends GroovyTestCase {
	@Test
	void testGetDefaultServiceProviders() {
		SimpleServiceImpl.metaClass.'static'.getDefaultServiceProviders = 
			{ -> [ "Provider 1", "Provider 2" ] } 
	
		assertEquals( [ "Provider 1", "Provider 2" ],
			SimpleServiceImpl.getDefaultServiceProviders() )		
	}
}
And that's it!

Sunday, August 7, 2011

Exploiting MongoDB together with Spring Data project: advanced concepts

In previous post we had started discussion about MongoDB and Spring Data projects. In this post I would like to show some advanced features (which could be available in next Spring Data milestone or release as part of core functionality).

First of all, let us extend our MongoService with a method that counts documents in collection which match specific query.
package com.example.mongodb;

import java.util.Arrays;
import java.util.Collection;

import org.springframework.beans.factory.annotation.Autowired;
import org.springframework.dao.DataAccessException;
import org.springframework.data.document.mongodb.CollectionCallback;
import org.springframework.data.document.mongodb.MongoOperations;
import org.springframework.data.document.mongodb.convert.MongoConverter;
import org.springframework.data.document.mongodb.query.Criteria;
import org.springframework.data.document.mongodb.query.Index;
import org.springframework.data.document.mongodb.query.Index.Duplicates;
import org.springframework.data.document.mongodb.query.Order;
import org.springframework.data.document.mongodb.query.Query;
import org.springframework.stereotype.Service;
import org.springframework.util.Assert;

import com.mongodb.BasicDBObject;
import com.mongodb.DBCollection;
import com.mongodb.MongoException;

@Service
public class MongoService {
    public long countDocuments( final String collection, final Query query ) {  
        return template.executeCommand( 
            "{ " +
                "\"count\" : \"" + collection + "\"," +
                "\"query\" : " + query.getQueryObject().toString() + 
            " }"  ).getLong( "n" );
    }
}
The approach for this particular functionality is to call native MongoDB command count passing the query as a parameter. The returning structure contains number of documents in n property.

Or, in more code-friendly way:
import org.springframework.dao.DataAccessException;
import org.springframework.data.document.mongodb.CollectionCallback;

import com.mongodb.DBCollection;
import com.mongodb.MongoException;

public long countDocuments( final String collection, final Query query ) {  
    return template.execute( collection,
        new CollectionCallback< Long >() {
            @Override
            public Long doInCollection( DBCollection collection ) 
                    throws MongoException, DataAccessException {
                return collection.count( q.getQueryObject() ) );
            }
        }
    );
}

Next useful feature is bulk inserts. Please note, that in current version of MongoDB 1.8.1, when there is a duplicate inside the collection of inserting documents, bulk insert stops on first duplicate and returns so all other documents won't be inserted. Be aware of such behavior. Before moving to code snippet, let me introduce simple class SimpleDocument which we will be persisting to MongoDB:
package com.example.mongodb;

import org.springframework.data.document.mongodb.mapping.Document;

@Document( collection = "documents" )
public class SimpleDocument {
    private String id;
    private String name;
    private String content;
 
    public SimpleDocument() { 
    }
 
    public SimpleDocument( final String id, final String name ) {
        this.id = id;
        this.name = name;
    }

    public String getName() {
        return name;
    }

    public void setName(String name) {
        this.name = name;
    }

    public String getId() {
        return id;
    }

    public void setId(String id) {
        this.id = id;
    }

    public String getContent() {
        return content;
    }

    public void setContent(String content) {
        this.content = content;
    }
}
Following method inserts all documents as single bulk update:
public void insert( final Collection< SimpleDocument > documents ) {  
    template.insert( documents, SimpleDocument.class );     
}
Another very cool and useful feature to explore is MongoDB's upserts (more about this here http://www.mongodb.org/display/DOCS/Updating): if document matching specific criteria exists, it will be updated, otherwise - new document will be inserted into collection. Here is a code snipped with demonstrates it by following use case: if SimpleDocument with such name exists, it will be updated, otherwise new document will be added to collection:
@Autowired private MongoConverter converter;

public void insertOrUpdate( final SimpleDocument document ) {
    final BasicDBObject dbDoc = new BasicDBObject();
    converter.write( document, dbDoc );
  
    template.execute( SimpleDocument.class, 
        new CollectionCallback< Object >() {
            public Object doInCollection( DBCollection collection ) 
                    throws MongoException, DataAccessException {
                collection.update( 
                    new Query()
                        .addCriteria( new Criteria( "name" ).is( document.getName() ) )
                        .getQueryObject(), 
                    dbDoc,  
                    true, 
                    false 
                );
     
                return null;
            }
        }
    );
}
Please notice usage of converter bean which helps to convert Java class to MongoDB's DBObject.

The last one I would like to show is findAndModify operation which does several things as one atomic sequence:
- find document matching criteria
- perform update
- return updated document (or old one, depending on what are your needs)
public void findAndModify( final Query query, final Update update ) {
    return template.execute( SimpleDocument.class,
        new CollectionCallback< SimpleDocument >() {
            @Override
            public SimpleDocument doInCollection( DBCollection collection ) 
                    throws MongoException, DataAccessException {
                return converter.read( SimpleDocument.class,       
                    collection.findAndModify( 
                        query.getQueryObject(), 
                        null,
                        null,
                        false,
                        update.getUpdateObject(),
                        true,
                        false
                    ) 
                );
            }
        }			
    );
}


For now, those are all interesting use cases I encountered. Honestly, I am very excited about MongoDB and strongly recommend it if it fits your application.

Wednesday, July 27, 2011

Exploiting MongoDB together with Spring Data project: basic concepts

All of us are observing the explosion of NoSql solutions these days. I get used to RDBMS but those are not a solution for all kind of challenges you might have. In my recent experience I got a chance to work with MongoDB - document database. In this post I intent to cover some basics (and some advanced features in next post) of using MongoDB together with Spring Data project. Before we start, small disclaimer: at the moment Spring Data is still in milestone phase so some classes / interfaces may change.

Before we start, please download and run MongoDB for your operating system. It's very simple so I won't spend time on this and let's start with simple POM file for our project:

    4.0.0

    mongodb
    com.example.spring
    0.0.1-SNAPSHOT
    jar

    
        UTF-8
        3.0.5.RELEASE


            org.springframework.data
            spring-data-mongodb
            1.0.0.M3


            log4j
            log4j
            1.2.16


            org.mongodb
            mongo-java-driver
            2.5.3


            org.springframework
            spring-core
            ${spring.version}


            org.springframework
            spring-context
            ${spring.version}


            springsource-milestone
            Spring Framework Milestone Repository
            http://maven.springframework.org/milestone


There are two key dependencies here:
- MongoDB java driver
- Spring Data for MongoDB

There are few ways to define MongoDB inside your Spring application context. Let me show a bit verbose but more flexible one:


        <constructor-arg index="0" ref="mongo" />
        <constructor-arg index="1" value="elements-db"/>


        <constructor-arg name="mongoDbFactory" ref="mongoDbFactory" />
        <constructor-arg name="mappingContext" ref="mappingContext" />         


        <constructor-arg name="mongoDbFactory" ref="mongoDbFactory"/>
        <constructor-arg name="mongoConverter" ref="converter" />        
        <property name="writeResultChecking" value="EXCEPTION" />
        <property name="writeConcern" value="NORMAL"/>


The role of each bean here:
  • mongo defines connection to MongoDB database (we rely on default settings, port 27027)
  • converter is used to convert Java classes to/from MongoDB's DBObject (== JSON)
  • mongoTemplate exposes operations we can do over MongoDB

So, we are ready to go!
Here are few code snippets to start with:
package com.example.mongodb;

import org.springframework.beans.factory.annotation.Autowired;
import org.springframework.dao.DataAccessException;
import org.springframework.data.document.mongodb.CollectionCallback;
import org.springframework.data.document.mongodb.MongoOperations;
import org.springframework.data.document.mongodb.query.Index;
import org.springframework.data.document.mongodb.query.Index.Duplicates;
import org.springframework.data.document.mongodb.query.Order;
import org.springframework.stereotype.Service;

import com.mongodb.BasicDBObject;
import com.mongodb.DBCollection;
import com.mongodb.MongoException;

@Service
public class MongoService  {
    @Autowired private MongoOperations template;

    public void createCollection( final String name ) {
        template.createCollection( name  );
    }

    public void dropCollection( final String name ) {
        template.dropCollection( name  );
    }

    public void insert( final Object object, final String collection ) {
        template.insert( object, collection );
    }
   
    public void createIndex( final String name, final String collection ) {
        template.ensureIndex( 
            new Index()
                .on( name, Order.DESCENDING )
                .unique( Duplicates.DROP ), 
            collection  
        );
    }
 
    // Remove / save / ... operations here
}
That's it with basics. Next post will cover advanced features: using bulk inserts, update or insert operation and executing MongoDB commands. :)

Saturday, June 11, 2011

Using JSR 330 annotations with Spring Framework

No doubts Spring Framework had (and still has) a great influence on JSR 330: Dependency Injection for Java. For a long time Spring Framework has a pretty rich set of Java annotations in order to push dependency injection to superior levels. But ... most of such annotations are Spring-specific (like @Autowired, @Component, etc.). So ... the question is: does Spring Framework support JSR 330: Dependency Injection for Java? And the answer is: yes, it does, starting from version 3.

So let me show by example how to use Spring Framework together with JSR 330: Dependency Injection for Java. First, we need to reference JSR 330 annotations, f.e. from atinjet project. As always, I'm using Apache Maven 2/3 so here is my POM file:

  4.0.0

  com.example
  cdi-spring
  0.0.1-SNAPSHOT
  jar

  
    UTF-8
 3.0.5.RELEASE


      javax.inject
      javax.inject
      1


      org.springframework
      spring-context
      ${spring.version}


      nexus.xwiki.org
      http://nexus.xwiki.org/nexus/content/repositories/externals/


Pretty simple, the only thing we need to do is to have JSR 330 annotations in classpath. That's it. Here is my simple Spring context XML (applicationContext.xml):


I just asked Spring to do all job for me. Let me declare two simple beans, OneBean and AnotherBean, and inject one bean into another. So here is OneBean.java:
package com.spring.cdi;

import javax.inject.Named;

@Named
public class OneBean {
 public void doWork() {
  System.out.println( "Work is done" );
 }
}
And here is AnotherBean.java:
package com.spring.cdi;

import javax.inject.Inject;
import javax.inject.Named;

@Named
public class AnotherBean {
 @Inject private OneBean oneBean;
 
 public void doWork() {
  oneBean.doWork();
 }
}
As you can see, there are no any Spring specific imports. Let me declare some Starter class which will host main() function (Starter.java):
package com.spring;

import org.springframework.context.ApplicationContext;
import org.springframework.context.support.ClassPathXmlApplicationContext;

import com.spring.cdi.AnotherBean;

public class Starter {
 public static void main( String[] args ) {
  ApplicationContext context = new ClassPathXmlApplicationContext( "applicationContext.xml" );
  AnotherBean bean = context.getBean( AnotherBean.class );
  bean.doWork();
 }
}
It just loads Spring application context from classpath, asks it for AnotherBean class and call the doWork() method on it (which delegates call to injected OneBean bean). Here is my log when I am running Starter class (please notice that Spring detected JSR 330 annotations and properly handled them):
Jun 11, 2011 1:08:03 PM org.springframework.context.support.AbstractApplicationContext prepareRefresh
INFO: Refreshing org.springframework.context.support.ClassPathXmlApplicationContext@2626d4f1: startup date [Sat Jun 11 13:08:03 EDT 2011]; root of context hierarchy
Jun 11, 2011 1:08:03 PM org.springframework.beans.factory.xml.XmlBeanDefinitionReader loadBeanDefinitions
INFO: Loading XML bean definitions from class path resource [applicationContext.xml]
Jun 11, 2011 1:08:03 PM org.springframework.context.annotation.ClassPathScanningCandidateComponentProvider registerDefaultFilters
INFO: JSR-330 'javax.inject.Named' annotation found and supported for component scanning
Jun 11, 2011 1:08:04 PM org.springframework.beans.factory.annotation.AutowiredAnnotationBeanPostProcessor 
INFO: JSR-330 'javax.inject.Inject' annotation found and supported for autowiring
Jun 11, 2011 1:08:04 PM org.springframework.beans.factory.support.DefaultListableBeanFactory preInstantiateSingletons
INFO: Pre-instantiating singletons in org.springframework.beans.factory.support.DefaultListableBeanFactory@4979935d: defining beans [anotherBean,oneBean,org.springframework.context.annotation.internalConfigurationAnnotationProcessor,org.springframework.context.annotation.internalAutowiredAnnotationProcessor,org.springframework.context.annotation.internalRequiredAnnotationProcessor,org.springframework.context.annotation.internalCommonAnnotationProcessor]; root of factory hierarchy
Work is done
So those beans could be easily used without modifications by any Java framework which supports JSR 330 (f.e., JBoss Weld). Cool stuff.

Saturday, May 14, 2011

Watch your Spring webapp: Hibernate and log4j over JMX

I have been actively using Java Management Extensions (JMX), particularly within web applications, in order to monitor application internals and sometimes tune some parameters at runtime. There are few very useful tools supplied as part of JDK, JConsole and JVisualVM, which allow to connect to your application via JMX and manipulate with exposed managed beans.

I am going to leave apart basic JMX concepts and concentrate on interesting use cases:
- exposing log4j over JMX (which allows to change LOG LEVEL at runtime)
- exposing Hibernate statistics over JMX

In order to simplify a bit all routines with exposing managed beans I will use Spring Framework which has awesome JMX support driven by annotations. Let's have our first Spring context snippet: exposing log4j over JMX.


That's how it look like inside JVisualVM with VisualVM-MBeans plugin installed (please notice that root's logger LOG LEVEL (priority) could be changed from WARN to any, let say, DEBUG, at runtime and have effect immediately):
Let's add Hibernate to JMX view! In order to do that I will create very simple Hibernate configuration using Spring context XML file (I will repeat configuration for JMX-related beans but it's exactly the same as in previous example):


                org.hibernate.dialect.HSQLDialect
                true


And now we see this picture (please notice very important Hibernate property in order to see some real data here hibernate.generate_statistics = true):

Cool, simple and very useful, isn't it? :)

Tuesday, May 10, 2011

Testing untestable: JUnit + Mockito + Spring Test against static instances

This post is about my recent experience with the projects I thought don't exists anymore nowadays. Unreadable code base, chaotic design, any minor change breaks everything and, for sure, no tests. Worth mentioning deployment is nightmare. How this projects are supposed to evolve? I have no idea ... but we need to make fixes and changes. So ... what should we do? Write tests first!

That's not about how to write tests, but about techniques which allows to overcome some very bad coding practices in case you are not allowed to modify code base (as my team was put in such restrictions).

Let's start with such a pearl: private static initialized members (we will skip the thread safety aspects and concentrate on instance member only).
package org.example;

public class SomeStaticUtil {
    private static SomeStaticUtil instance = SomeStaticUtil.getInstance();
 
    public static SomeStaticUtil getInstance() {
        if( instance == null ) {
            instance = new SomeStaticUtil();
        }
  
        return instance;
    }
}
So how to substitute SomeStaticUtil with different implementation suitable for testing scenarios (aka mocks)? Remember, you are not allowed to modify the code (I would love to). There are few ways to do that:
- Excellent PowerMock framework. Didn't fit this project because bytecode manipulations crashed JVM.
- Magnificent AspectJ framework. Didn't fit this project because of complex aspects and necessary runtime weaving.
- Old and well-known reflection :-)

So what we can do here? Let's us exploit two excellent and very powerful test scaffolding frameworks: Mockito and Spring Test. Here is what we can do:
package org.example;

import org.junit.Before;
import org.junit.Test;
import org.mockito.Mockito;
import org.springframework.test.util.ReflectionTestUtils;

public class SomeStaticUtilTestCase {
    private SomeStaticUtil someStaticUtil;
 
    @Before
    public void setUp() {
        someStaticUtil = Mockito.mock( SomeStaticUtil.class );
        ReflectionTestUtils.setField( someStaticUtil, "instance", someStaticUtil );
    }
 
    @Test
    public void someTest() {
        // ... some tests
    }
}
Very simple but powerful: replace private static member instance with mock implementation. Cool.

Saturday, April 2, 2011

Force your beans validation using JSR 303 and Hibernate Validator 4.1.0

In my list of most loved features JSR 303 is somewhere among top ones. Not only because it's extremely useful, but also because it has simple design and extensibility. Hibernate project actively uses validation techniques for a long time as part of Hibernate Validator subproject, recently with JSR 303 implementation support.

Today I would like to share some basic uses cases of JSR 303 annotations and programmatic validation support. Let us start with first one.

1. Assume you are expecting Person object to be passed to you business logic layer, just typical Java bean with few properties.
package org.example;

public class Person {
    private String firstName;
    private String lastName;
    
    public void setFirstName( String firstName ) {
        this.firstName = firstName;
    }
 
    public String getFirstName() {
        return firstName;
    }

    public void setLastName( String lastName ) {
        this.lastName = lastName;
    }

    public String getLastName() {
        return lastName;
    }   
}
Further, let us assume that according to business logic firstName and lastName properties are required. There are many ways to enforce such kind of constraints but we will use JSR 303 bean validation and Hibernate Validator.
package org.example;

import org.hibernate.validator.constraints.NotBlank;

public class Person {
    @NotBlank private String firstName;
    @NotBlank private String lastName;
    
    ...  
}
The question arises who will actually perform validation? The most straightforward solution is to do it using utility class.
package org.example;

import java.util.HashSet;
import java.util.Set;

import javax.validation.ConstraintViolation;
import javax.validation.ConstraintViolationException;
import javax.validation.Validation;
import javax.validation.Validator;
import javax.validation.ValidatorFactory;
import javax.validation.groups.Default;

public class ValidatorUtil {
    private final ValidatorFactory factory;
 
    public ValidatorUtil() {
        factory = Validation.buildDefaultValidatorFactory();
    }
  
    public< T > void validate( final T instance ) {  
        final Validator validator = factory.getValidator();
  
        final Set< ConstraintViolation< T > > violations = validator
            .validate( instance, Default.class );

        if( !violations.isEmpty() ) {
            final Set< ConstraintViolation< ? > > constraints = 
                new HashSet< ConstraintViolation< ? > >( violations.size() );

            for ( final ConstraintViolation< ? > violation: violations ) {
                constraints.add( violation );
            }
   
            throw new ConstraintViolationException( constraints );
        }
    }
}
Having such a class validation is easy:
final Person person = new Person();
new ValidatorUtil().validate( person );
ConstraintViolationException exception will be thrown in case of any validation errors. Let us move on to more complicated examples.

2. Assume you are expecting Department object to be passed to you business logic containing at least one (valid!) person. Let me skip the details and present the final solution here.
package org.example;

import java.util.Collection;

import javax.validation.Valid;

import org.hibernate.validator.constraints.NotEmpty;

public class Department {
    @NotEmpty @Valid private Collection< Person > persons;

    public void setPersons( Collection< Person > persons ) {
        this.persons = persons;
    }

    public Collection< Person > getPersons() {
        return persons;
    }
}
The validation above ensures that Department contains at least one Person instance and each Person's instance is itself valid.

There are just a lot of other use case out there which Hibernate Validator is able to handle out of the box: @Min, @Man, @Email, @Url, @Range, @Length, @Pattern, ... This post is just a starting point ...

Saturday, March 26, 2011

Testing Spring Web Service endpoint

In previous post we have covered very interesting approach to build SOAP web services using lightweight by very powerful Spring Web Services framework. To wrap it up, let me show how easy you can test your web services.

Let me start with Spring context for test case (which is 99% the copy-paste from previous post).


Let us save this context to /src/test/resources/META-INF/spring-context.xml. There are two minor differences (comparing to initial one):
  • element <ws:static-wsdl/> has been removed
  • element <bean id="schema" ... /> has been added
Having context prepared, let us move on to test case itself.
package org.example;

import static org.springframework.ws.test.server.ResponseMatchers.validPayload;
import static org.example.SoapActionRequestCreator.withPayload;

import java.io.IOException;

import org.junit.Test;
import org.junit.runner.RunWith;
import org.springframework.beans.factory.annotation.Autowired;
import org.springframework.context.ApplicationContext;
import org.springframework.core.io.Resource;
import org.springframework.test.context.ContextConfiguration;
import org.springframework.test.context.junit4.SpringJUnit4ClassRunner;
import org.springframework.ws.test.server.MockWebServiceClient;

@RunWith( SpringJUnit4ClassRunner.class )
@ContextConfiguration( locations = "/META-INF/spring-context.xml" )
public class UserProfileEndpointTestCase {
    @Autowired private ApplicationContext applicationContext;
    @Autowired private Resource schema;
 
    private MockWebServiceClient client; 

    @Before
    public void setUp() {
        client = MockWebServiceClient.createClient( applicationContext );
    }
   
    @Test
    public void testServiceCall() throws IOException {
        final Resource payload = applicationContext.getResource( "Request.xml" );
  
        client.sendRequest( withPayload( "UserProfile", request ) ).   
            andExpect( validPayload( schema ) ); 
    }
}
This particular example does send request to SOAP web service and ensures that response is valid (against XSD schema), all that by leveraging Spring Web Services test scaffolding. There is one class which requires a bit of explanation: org.example.SoapActionRequestCreator. Nevertheless Spring Web Services provides rich set of payload builders, I didn't find the one which allows to pass SOAP action into request. So this small utility class has been developed. Here is a code for it:
package org.example;

import java.io.IOException;

import org.springframework.core.io.Resource;
import org.springframework.util.Assert;
import org.springframework.ws.WebServiceMessage;
import org.springframework.ws.WebServiceMessageFactory;
import org.springframework.ws.soap.SoapMessage;
import org.springframework.ws.test.server.RequestCreator;
import org.springframework.ws.test.support.creator.PayloadMessageCreator;
import org.springframework.ws.test.support.creator.WebServiceMessageCreator;
import org.springframework.xml.transform.ResourceSource;

public class SoapActionRequestCreator implements RequestCreator {
    private final WebServiceMessageCreator adaptee;
    private final String action;
 
    private SoapActionRequestCreator ( final String action, 
            final WebServiceMessageCreator adaptee ) {
        this.action = action;
        this.adaptee = adaptee;
    }

    public static RequestCreator withPayload( final String action, 
            final Resource payload )throws IOException {
        Assert.notNull(payload, "'payload' must not be null");
        return new SoapActionRequestCreator( 
            action, new PayloadMessageCreator( new ResourceSource( payload ) ) );
    }
   
    @Override
    public WebServiceMessage createRequest( 
            final WebServiceMessageFactory messageFactory ) throws IOException {
        final WebServiceMessage message = adaptee.createMessage( messageFactory );
        Assert.isInstanceOf( SoapMessage.class, message );

        if( message instanceof SoapMessage ) {
            ( ( SoapMessage )message ).setSoapAction( action );
        }
  
        return message;
    }
}
This is just a very basic example. There are a bunch of tests you can do to ensure your SOAP web service performs as expected. I encourage to explore Spring Web Services documentation. All that should help us to develop high quality code and be proud of it.

Monday, March 21, 2011

Get hands on Spring Web Services

Suppose you are Java web developer. Suppose you are deploying all your stuff on Apache Tomcat. Suppose you are about to develop some web services. There are number of choices you can do that (including Apache Axis 2). But one I would like to describe today is ... Spring Web Services project.

I will omit the web service contract design phase and assume we are developing SOAP web service and WSDL (or XSD schema) is already available. The best way (in my opinion) to generate Java model from WSDL is to use JAXB2 specification implementation. There are several ways to get it done:
- using xjc compiler
- using Maven 2.x/3.x plugin (I lean towards this one and use it all the time)

    org.jvnet.jaxb2.maven2
    maven-jaxb2-plugin
    0.7.5
    
        WSDL
        src/main/resources
        
            */*.wsdl


Ok, so we have our Java classes (with JAXB2 annotations), generated from our WSDL. As picture describes, we have UserProfileService web service with UserProfile operations which accepts UserProfileRequest as input and returns UserProfileResponse. In case of exception, UserProfileFault has been returned.
Let's do some routine work in order to configure Spring application context with Spring Web Services specific beans: message factory, marshallers and endpoint processors.


And here is how our web service endpoint looks like:
package org.example;

import javax.xml.bind.JAXBElement;

import org.springframework.beans.factory.annotation.Autowired;
import org.springframework.ws.server.endpoint.annotation.Endpoint;
import org.springframework.ws.server.endpoint.annotation.RequestPayload;
import org.springframework.ws.server.endpoint.annotation.ResponsePayload;
import org.springframework.ws.soap.server.endpoint.annotation.SoapAction;

@Endpoint
public class UserProfileEndpoint {
    @SoapAction( "UserProfile" )
    public @ResponsePayload JAXBElement< UserProfileResponse > getUserProfile(
           @RequestPayload JAXBElement< UserProfileRequest > request ) {
  ...
 }
}
There are a few important things to mention:
- @Endpoint annotation tells Spring Web Services that we have web service endpoint
- @SoapAction annotation (on the methods) tells Spring Web Services that method in question is responsible to handle particular SOAP action
- @ResponsePayload and @RequestPayload annotations tell Spring Web Services to extract payload from SOAP message, deserialize it to Java classes (using JAXB2 binding), and match input/output parameters against declared handlers (methods)

That's pretty much it to make things work! Spring Web Services takes care about all boiler-plate code and allows to concentrate on what really matters - implementation.

So, web service is up and running. Aside from very basic features, Spring Web Services allows to configure response/request validation (against XSD schema). To do that, we need just to add validation interceptor to the application context:


Also, Spring Web Services allows to define our own SOAP fault handlers (based on exception pattern) and much more! For example, if there is a need to add some details to SOAP fault in case of any exception, here is the way to do that:
package org.example;

import org.springframework.stereotype.Component;
import org.springframework.ws.context.MessageContext;
import org.springframework.ws.soap.SoapFault;
import org.springframework.ws.soap.server.endpoint.SimpleSoapExceptionResolver;

@Component
public class UserProfileEndpointExceptionResolver extends SimpleSoapExceptionResolver {
    public UserProfileEndpointExceptionResolver() {
        super();

        // Let this handler precede all other handlers
        super.setOrder( HIGHEST_PRECEDENCE );
    }

    @Override
    protected void customizeFault( MessageContext messageContext, Object endpoint, Exception ex, SoapFault fault ) {
       // Customize here your SOAP fault with some details
    }
}
That's it. In next post I would like to share how to write JUnit tests and ensure your web service works as expected.

Wednesday, February 2, 2011

Using @Configurable in Spring Framework: inject dependency to any object

Honestly, I like Spring Framework: awesome dependency management combined with rich features and great community. Recently I encountered very nice feature - @Configurable. In short, it allows developer to inject dependency into any object (who defines this annotation) without explicit bean definition. It's pretty cool. Techniques behind - AspectJ with runtime weaving.

Let me show how it works by creating simple test project. Let's start with Maven's project descriptor (pom.xml):

 4.0.0

 spring-configurable
 spring-configurable
 0.0.1-SNAPSHOT
 jar

 spring-configurable
 http://maven.apache.org

 
  UTF-8
  3.0.5.RELEASE


   org.aspectj
   aspectjweaver
   1.6.5


   org.springframework
   spring-beans
   ${spring.framework.version}


   org.springframework
   spring-aspects
   ${spring.framework.version}


   org.springframework
   spring-core
   ${spring.framework.version}


   org.springframework
   spring-context
   ${spring.framework.version}


   org.springframework
   spring-jdbc
   ${spring.framework.version}


Next one, let me create application context (applicationContext.xml) and place it inside src/main/resources:


 <context:annotation-config />
 <context:spring-configured />
 <context:load-time-weaver />
 
 <context:component-scan base-package="com.test.configurable" />
 
 <bean id="dataSource" class="org.springframework.jdbc.datasource.DriverManagerDataSource" />

Two key declarations here are <context:spring-configured /> and <context:load-time-weaver />. According to documentation, <context:spring-configured /> "... signals the current application context to apply dependency injection to non-managed classes that are
instantiated outside of the Spring bean factory (typically classes annotated with the @Configurable annotation)..."
and <context:load-time-weaver /> turns on runtime weaving.

Respective Java code which uses power of @Configurable annotation is located into Starter.java, which itself is placed inside src/main/java:
package com.test.configurable;

import javax.sql.DataSource;

import org.springframework.beans.factory.annotation.Autowired;
import org.springframework.beans.factory.annotation.Configurable;
import org.springframework.context.ApplicationContext;
import org.springframework.context.support.ClassPathXmlApplicationContext;
import org.springframework.util.Assert;

public class Starter {
 
 @Configurable
 private static class Inner {
  @Autowired private DataSource dataSource;  
 }
 
 public static void main(String[] args) {
  final ApplicationContext context = new ClassPathXmlApplicationContext( "/applicationContext.xml" );
  
  final DataSource dataSource = context.getBean( DataSource.class );
  Assert.notNull( dataSource );
  
  Assert.notNull( new Inner().dataSource );
 } 

}
As we see, class Inner is not a bean, is nested into another class and is created simply by calling new. Nevertheless, dataSource bean is injected as expected. Last but not least, in order this example to work, application should be run using an agent (I am using Spring Framework 3.0.5): -javaagent:spring-instrument-3.0.5.RELEASE.jar